Developing software efficiently is crucial, especially when working on multiple development environments simultaneously. Fortunately, Docker provides a solution that streamlines this process.
If you’re unfamiliar with Docker, it’s a powerful tool that allows you to create, manage, and run applications within containers. Using containers helps ensure that your application runs consistently regardless of the underlying infrastructure.
In this article, we’ll provide a comprehensive guide to Docker, starting with an overview of its features and benefits. We’ll also walk you through the process of installing Docker and provide tutorials on creating Docker containers.
By the end of this article, you’ll have a solid understanding of Docker and how it can help you develop software more efficiently.
What is Docker?
Docker is a powerful application that streamlines the software development process by unifying various software files and their dependencies into containers. This offers several advantages over traditional virtualization methods.
When developing applications, virtualization is often necessary to ensure compatibility with various platforms and hardware configurations. However, traditional virtualization methods require a full operating system to be set up, which can be resource-intensive and time-consuming.
Containers, on the other hand, provide a lightweight alternative to virtualization. With Docker, developers can create containers that include only the necessary components for their applications to run, without the need for a full operating system. This results in smaller file sizes and faster deployment times.
In summary, using Docker containers can greatly simplify the software development process by reducing the resources needed for virtualization and streamlining deployment.
Difference Between Virtual Machine (VM) and Docker
Virtual machines have a guest OS installed, which requires a significant amount of resources. Containers, on the other hand, do not have a guest OS and are much more efficient in terms of resources.
However, virtual machines are more secure as they operate with independent space and resources separate from other guests’ OSs.
Why We Need Docker
Then, what are the Docker functions that will benefit your application development? Here are six of them:
- Simplify Application Development – Docker can make the developer’s job easier when developing applications. The reason is, Docker is more resource-efficient and able to provide a stable environment to run on any device, from cloud servers to personal computers.
- Simplify Configuration – Docker has no overhead so developers can run the application under test without added configuration.
- Facilitate Development of Pipeline Code – Developers can take advantage of the Docker container as a place to test Pipeline code and the tools needed more easily.
- Can be Used for Debugging – The existence of a debug feature can help developers to solve problems in applications without having to bother leaving the environment in Docker.
- Supports MultiTenancy – Docker is suitable for building multitenancy structured applications such as Software as a Service (SaaS). You can create more than one isolated environment and run application objects for each tenant.
- Increasing Resources Quickly – With Docker, increasing device resources can be done quickly so that the duration of software development is shorter.
Install Docker on Linux Systems
To install Docker on Ubuntu or Linux Mint, you can follow these steps:
$ sudo apt-get update
$ sudo apt-get install ca-certificates curl gnupg
$ sudo mkdir -m 0755 -p /etc/apt/keyrings
$ sudo chmod a+r /etc/apt/keyrings/docker.gpg
$ curl -fsSL https://download.docker.com/linux/ubuntu/gpg | sudo gpg --dearmor -o /etc/apt/keyrings/docker.gpg
$ echo \
  "deb [arch="$(dpkg --print-architecture)" signed-by=/etc/apt/keyrings/docker.gpg] https://download.docker.com/linux/ubuntu \
  "$(. /etc/os-release && echo "$VERSION_CODENAME")" stable" | \
  sudo tee /etc/apt/sources.list.d/docker.list > /dev/null
$ sudo apt-get update
$ sudo apt-get install docker-ce docker-ce-cli containerd.io docker-buildx-plugin docker-compose-plugin
$ sudo docker run hello-world
To install Docker on Debian Linux, use:
$ sudo apt-get update
$ sudo apt-get install ca-certificates curl gnupg
$ sudo mkdir -m 0755 -p /etc/apt/keyrings
$ sudo chmod a+r /etc/apt/keyrings/docker.gpg
$ curl -fsSL https://download.docker.com/linux/debian/gpg | sudo gpg --dearmor -o /etc/apt/keyrings/docker.gpg
$ echo \
  "deb [arch="$(dpkg --print-architecture)" signed-by=/etc/apt/keyrings/docker.gpg] https://download.docker.com/linux/debian \
  "$(. /etc/os-release && echo "$VERSION_CODENAME")" stable" | \
  sudo tee /etc/apt/sources.list.d/docker.list > /dev/null
$ sudo apt-get update
$ sudo apt-get install docker-ce docker-ce-cli containerd.io docker-buildx-plugin docker-compose-plugin
$ sudo docker run hello-world
To install Docker on Fedora, you can follow these steps:
$ sudo dnf update
$ sudo dnf install dnf-plugins-core
$ sudo dnf config-manager --add-repo https://download.docker.com/linux/fedora/docker-ce.repo
$ sudo dnf install docker-ce docker-ce-cli containerd.io
$ sudo systemctl start docker
$ sudo systemctl enable docker
$ sudo docker run hello-world
To install Docker on RHEL, CentOS, Rocky, and AlmaLinux, you can follow these steps:
$ sudo yum update
$ sudo yum install -y yum-utils
$ sudo yum-config-manager --add-repo https://download.docker.com/linux/rhel/docker-ce.repo
OR
$ sudo yum-config-manager --add-repo https://download.docker.com/linux/centos/docker-ce.repo
$ sudo yum install docker-ce docker-ce-cli containerd.io
$ sudo systemctl start docker
$ sudo systemctl enable docker
$ sudo docker run hello-world
This will download a test image and run a container. If everything is working correctly, you should see a message that says “Hello from Docker!“.
Install Docker on Windows Systems
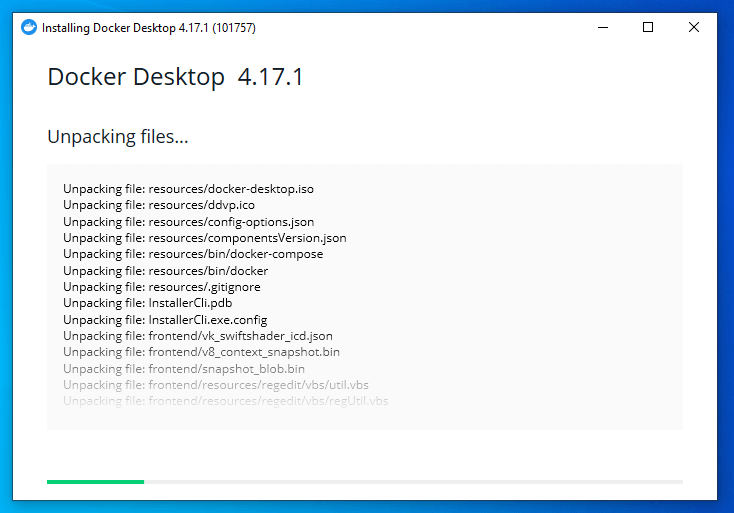
First, go to the Docker website and download the appropriate version of Docker Desktop for your version of Windows.
Next, follow the on-screen instructions to install Docker Desktop on your Windows machine and launch Docker Desktop.
You may be prompted to enable certain features such as Hyper-V or the Windows Subsystem for Linux (WSL). After Docker Desktop is running, verify that Docker is installed correctly by opening PowerShell or Command Prompt and running the following command:
docker run hello-world
Install Docker on Mac
First, install Homebrew (if you haven’t already) by opening a terminal and entering the following command:
/bin/bash -c "$(curl -fsSL https://raw.githubusercontent.com/Homebrew/install/master/install.sh)"
Once Homebrew is installed, you can use it to install Docker by entering the following command in the terminal:
brew install docker
After the installation is complete, start the Docker service by entering the following command:
brew services start docker
Verify that Docker is installed correctly by running the following command in the terminal:
docker run hello-world
That’s it! Docker should now be installed and running on your Mac.
The Main Components of Docker
The following are the main components of Docker.
Docker Engine
- Docker is made up of a server/client structure.
- The server acts in the form of a Docker daemon process that runs in the background.
- The Docker Engine uses Rest API as an inter-process communication technique to request this Docker daemon process.
Docker Image
Docker Image is a template with commands to create a Docker container (a set of scripts). It is common to stack multiple images with layers to create the desired image.
Features:
- The capacity of the Docker image is hundreds of MB ~ hundreds of GB, but it is very small compared to the image of a virtual machine.
- The image does not have a state value and is immutable.
- One image can generate multiple containers, and even if the container is deleted, the image remains unchanged. Docker creates an image with a file called Dockerfile, which makes it easy to manage the version of the set file you used, such as the dependency package with the source.
Docker Container
The Docker Image runs in the form of a Linux container (instance), which, along with the dependency of the application, packages or encapsulates the application itself to operate the process in isolated spaces.
Features:
- Containers are created and executed by adding a read/write (read and write) layer to the image layer. Therefore, even if multiple containers are created, only minimal capacity is used, and the changed part is less for the read/write layer.
- The container remains in memory even after it has ended. To delete it, it must be explicitly deleted. Therefore, deleting the container is the same as deleting the file generated by the container.
Docker Basic Commands
Docker instructions are performed in the form of CLI (Command Line Interface).
Command to run Docker:
# docker run [OPTIONS] IMAGE[:TAG|@DIGEST] [COMMAND] [ARG...]

In this example, we just run a basic image called hello-world.
Check Docker Container List
If no options are given, only the list of Docker containers currently running is shown. If you specify the a or -all option, it also shows containers that have stopped running.
This example shows that the container remains undeleted even when terminated, the terminated container can be run again and the container’s read/write Layer exists. Containers should be removed neatly if explicitly deleted.
# docker container ls
# docker container ls -a

Stop Docker Container
To stop a container, just enter the Docker ID after the Docker stop. The length of the Docker ID is 64 characters long. When used as the command’s factor, you don’t need to enter all of these ID values, you can only enter the minimum digits of the front seat that don’t overlap with other IDs.
For example, if the Docker ID is 5cc02e5ed284, it is okay to enter 5cc only.
# docker container ls -a
#docker stop 5cc

List Docker Images
To view the docker images that have been downloaded to your system.
# docker image ls -a

Download Docker Images
Pull is a command to download images from the Docker Hub, a repository for Docker images.
Let’s, for example, get an nginx image from Docker Hub as shown.
# docker pull nginx
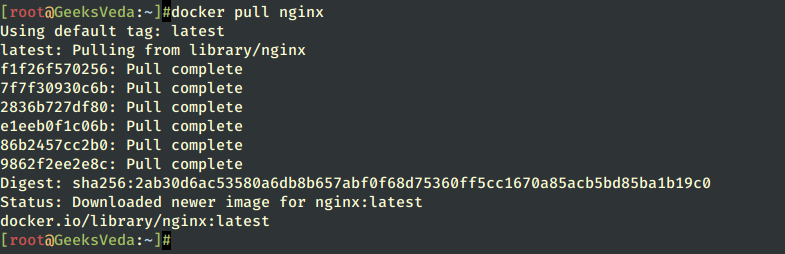
Here it says “Using default tag: latest“, which means if you don’t specify the version that you need with the command, it will pull the latest version.
Run Docker Images
To run the downloaded docker image, use the following command.
# docker container run --publish 8080:80 nginx
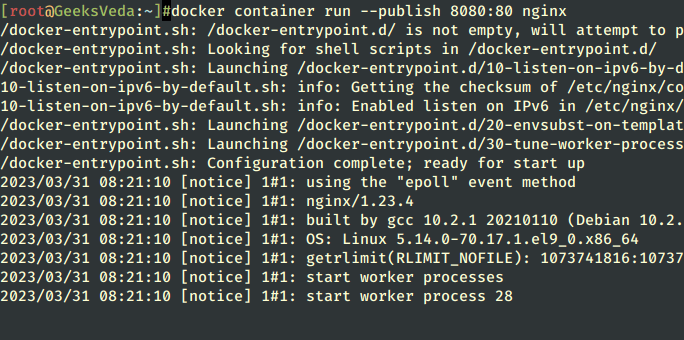
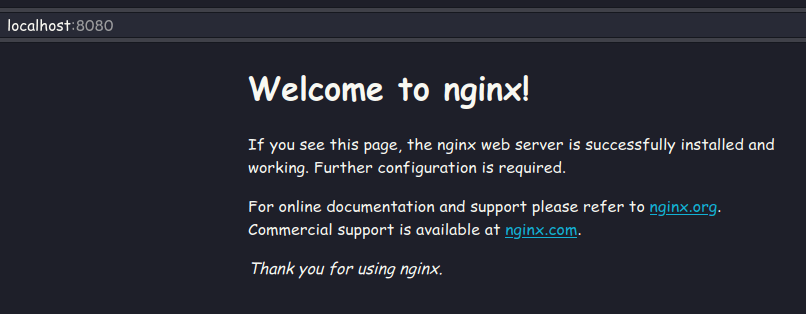
Now verify the nginx container is running by navigating to localhost:8080.
Delete Docker Images
To delete the nginx image that we just downloaded, we can use the command.
# docker rmi nginx
Here it gives us an error saying that we can’t delete this image because it’s used in a container. so we can add the -f option to force delete.
# docker rmi -f nginx

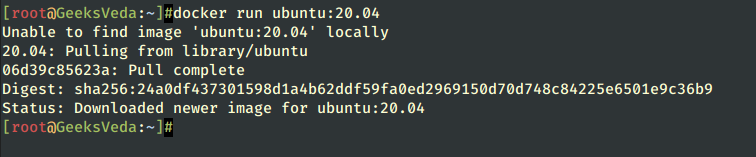
Run Ubuntu Container
The Ubuntu 20.04 image is downloaded, and the container is executed. It runs finely, but after the container is created, it does not give orders for any action, so it ends as soon as the container is created.
# docker run ubuntu:20.04
Interact with Docker Containers
Now that we know how to start and stop containers, it’s time to learn about container run options.
-ior--interactive– Interact with containers (connect to the container’s standard input).-tor--tty– Assign a pseudo-terminal.-dor--detach– Avoid terminal lockup (run in the background).--rm– Automatically remove stopped containers.--nameName the container (make it easier to specify containers).--platform– Explicit image architecture.
Let’s take an example of how the Ubuntu container can be operated by bash when started. For bash-like interactions, you’ll need the --interactive option to accept input from the host machine’s terminal.
# docker run -it ubuntu:20.04 /bin/bash
# cat /etc/lsb-release
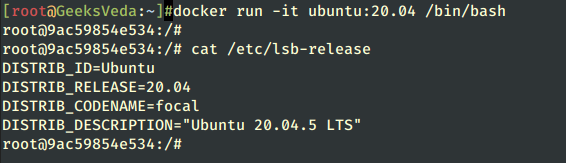
Here we get information about Ubuntu, such as its name, version, and distribution name (CODENAME).
How to Use Dockerfile
After comprehending the fact that all operations executed within a container get canceled upon its termination and that images are built upon layers of information, we can appreciate the significance of Dockerfile.
The official images on Docker Hub have a minimum number of layers to ensure they are lightweight and not overloaded with features. However, these images may not always meet our requirements, as they lack some essential functionalities. For instance, the Ubuntu container does not include vi, curl, etc.
In such scenarios, we can create custom images that have all the necessary setup completed in advance. Dockerfile enables us to add additional layers to existing images effortlessly, without worrying about OS settings, and build our personalized images to meet our specific needs.
Basic Dockerfile
The Dockerfile has several directives, but you don’t have to memorize them all at once, so you’ll learn a few representative ones.
- FROM – Specify base image
- RUN – execute arbitrary command
- COPY – Add files from the host machine to the image
- CMD – specify a default instruction
Will explain one by one while writing Dockerfile.
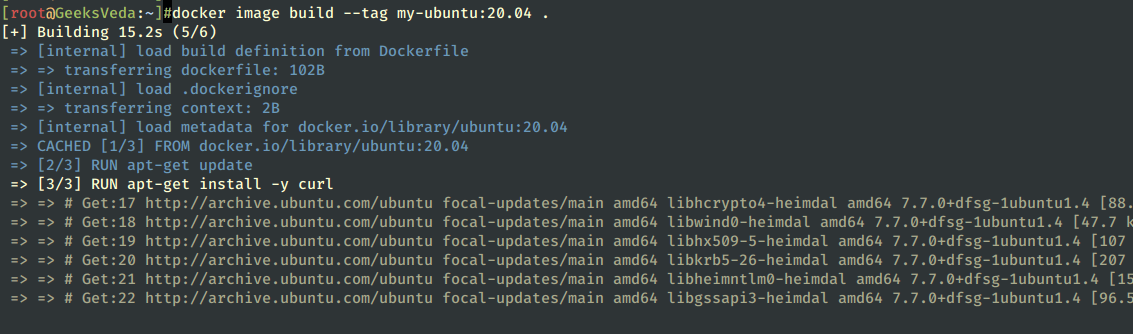
So let’s make an example where we gonna use the ubuntu image that we downloaded. First, you need to create a file with the name Dockerfile and add the following lines.
FROM ubuntu:20.04
RUN apt-get update
RUN apt-get install -y curl
Build Docker Image
Now build the image with the following command, and make sure to execute the command in the directory where Dockerfile is located. The option --tag is used to add a tag to our image; if it is not used, we will get a random string.
# docker image build --tag my-ubuntu:20.04 .
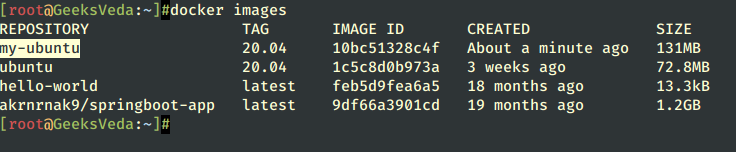
Let’s now check if the image was created.
# docker images
Docker Compose
Docker Compose uses the YAML file with the container’s settings defined to create the container through the Docker engine.
It is a function that can be used usefully when multiple containers are organically tied up and require operation as one application. It provides a tool called Docker Compose that uses the YAML format.
For Linux environments, it must be installed separately, but on macOS or Windows, it is installed as in the initial installation, so there is no need to install it separately.
After creating the docker-container.yml file, it can be used through the composite command.
Conclusion
In this post, we discussed the importance of developing software efficiently, particularly when working on multiple development environments simultaneously. We introduced Docker as a powerful tool that can streamline the software development process by unifying various software files and their dependencies into containers.
Using Docker containers can help ensure that the application runs consistently regardless of the underlying infrastructure, and this results in smaller file sizes and faster deployment times.
We highlighted some of the key benefits of Docker, such as simplifying application development, configuration, and pipeline code development, enabling debugging, supporting multitenancy, and increasing resources quickly.
We also provided a comprehensive guide to installing Docker on various operating systems, including Ubuntu/Linux Mint, Fedora/RHEL, Mac, and Windows.