In today’s guide, you will learn about how to implement copy-to-clipboard functionality in JavaScript for efficient content sharing. Moreover, you will discover techniques to enable users to easily copy and save text, images, and rich media with just a few clicks.
So, get ready to enhance user convenience and streamline the copying experience with proper clipboard integration.
What is Clipboard API in JavaScript
In JavaScript, Clipboard is an API that permits web applications to interact with the system clipboard. It allows them to read data from the clipboard, fetch it, or write new data to it.
It provides different properties and methods for accessing clipboard data in several formats, such as normal text, rich text, images, and others. More specifically, the purpose of Clipboard API is to offer a standard way to developers who want to work with clipboard data.
It enables them to perform different operations such as copying and pasting content between web applications and other software.
Now, let’s check out the methods for copying text to the clipboard in JavaScript.
Copy Text to the Clipboard in JavaScript
While writing the JavaScript code, follow the below-given steps for copying text to the clipboard.
- Access Clipboard API: In order to copy text to the clipboard, the “
navigator.clipboard” object can be utilized. This object is available in all modern browsers that offer support for the Clipboard API. - Request Permission to Write to the Clipboard: Use the “
navigator.clipboard.writeText()” method for requesting permission from the user to write to the clipboard. This method outputs a promise that resolves when text has been copied to the clipboard. - Implement Relevant Code to Copy Text: After getting the required permission, invoke the “
navigator.clipboard.write()” with the text as an argument that is needed to copy.
In accordance with the given steps, we have provided the code that can be used for copying text to the clipboard. This code includes a textarea input element and a “Copy Text” button. When the button is clicked, the text added inside is retrieved.
If the textarea is not empty, the code verifies if your browser supports the Clipboard API. To do so, we have specified “navigator.clipboard” inside the “if” condition.
If the condition is met, the “navigator.clipboard.writeText()” method will copy the text to the clipboard. Then, the added message will be displayed on the console accordingly.
<!DOCTYPE html>
<html>
<head>
  <title>GeeksVeda</title>
</head>
<body>
  <textarea id="text" placeholder="Please Enter any Text"></textarea>
  <button id="btn">Copy Text</button>

  <script>
    const btn = document.getElementById('btn');
    const textInput = document.getElementById('text');

    btn.addEventListener('click', () => {
      const text = textInput.value.trim();

      if (text !== '') {
        if (navigator.clipboard) {
          navigator.clipboard.writeText(text)
            .then(() => {
              console.log('Text has been copied to the clipboard');
            })
            .catch(error => {
              console.error('Error copying to clipboard:', error);
            });
        } else {
          console.log('Clipboard API is not supported');
        }
      }
    });
  </script>
</body>
</html>
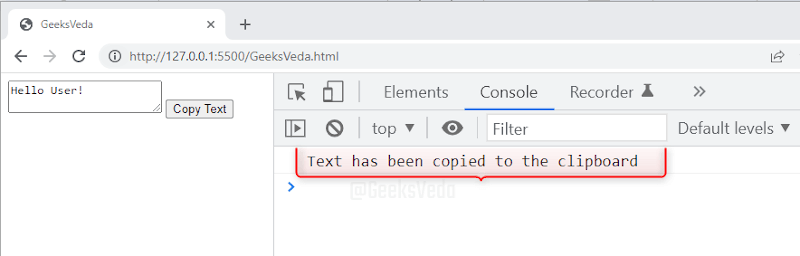
Running the given code will show the webpage having a textarea and a button. Inspect the opened web page, write some text in the highlighted field, and click on the “Copy Text” button.
Resultantly, the message will be displayed on the console that the text has been copied to the clipboard.
Retrieve Text From Clipboard in JavaScript
Similar to copying text, retrieving text from Clipboard in JavaScript also comprises a series of steps.
- Access the Clipboard API: For pasting or retrieving the text from the clipboard, firstly access the Clipboard API. For this purpose, you can utilize the “
navigator.clipboard” object, which supports the essential properties and methods for clipboard interactions. - Request Permission to Read Clipboard Content: Modern browsers need explicit permissions from the user for accessing the clipboard. To do so, invoke the “
navigator.clipboard.readText()” method. As a result, the browser will display a prompt to the user for grating the consent for reading the clipboard contents. - Implement Necessary Code to Extract Text Data: Lastly, you can extract the text data from the clipboard with the “
navigator.clipboard.readText()” method when permission is granted. This method will output a promise that resolves to the text placed in the clipboard. Then, you can handle the retrieved text as per requirements.
Now, we will add a “Retrieve Text” button and an output paragraph element in the ongoing example, having a textarea and a “Copy Text” button. Clicking the “Copy Text” button will copy the text of the textarea to the clipboard with the “navigator.clipboard.write()” method.
However, when the “Retrieve Text” button will be clicked, the added “if” condition checks if the Clipboard API is supported and then utilizes the “navigator.clipboard.readTex()” method for retrieving the text from the clipboard.
As a result, the retrieved text will be displayed in the paragraph element.
<!DOCTYPE html>
<html>
<head>
  <title>GeeksVeda</title>
</head>
<body>
  <textarea id="text" placeholder="Please Enter any Text"></textarea>
  <button id="btn">Copy Text</button>

  <button id="retrieveBtn">Retrieve Text</button>
  <p id="output"></p>

  <script>
    const btn = document.getElementById('btn');
    const textInput = document.getElementById('text');
    const retrieveBtn = document.getElementById('retrieveBtn');
    const output = document.getElementById('output');

    btn.addEventListener('click', () => {
      const text = textInput.value.trim();

      if (text !== '') {
        if (navigator.clipboard) {
          navigator.clipboard.writeText(text)
            .then(() => {
              console.log('Text has been copied to the clipboard');
            })
            .catch(error => {
              console.error('Error copying to clipboard:', error);
            });
        } else {
          console.log('Clipboard API is not supported');
        }
      }
    });

    retrieveBtn.addEventListener('click', () => {
      if (navigator.clipboard) {
        navigator.clipboard.readText()
          .then(text => {
            output.textContent = 'Text from clipboard: ' + text;
          })
          .catch(error => {
            console.error('Error reading from clipboard:', error);
          });
      } else {
        console.log('Clipboard API is not supported');
      }
    });
  </script>
</body>
</html>
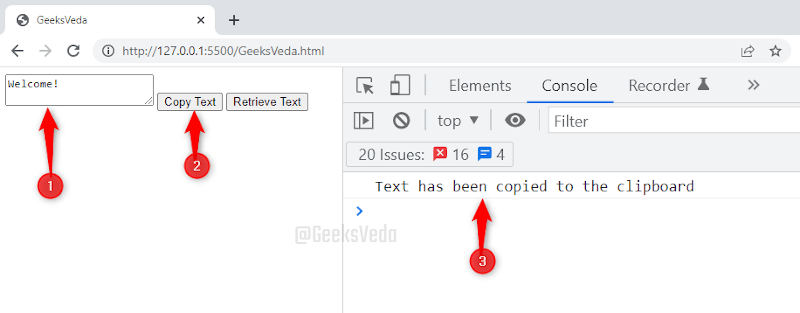
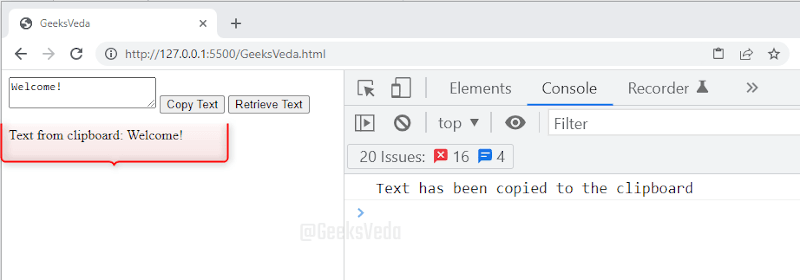
To test out the code, run the project and add some text in the input field. After doing so, click on the “Copy Text” button and you will be informed that the text has been copied to the clipboard. This message will be displayed on the on-screen console window.
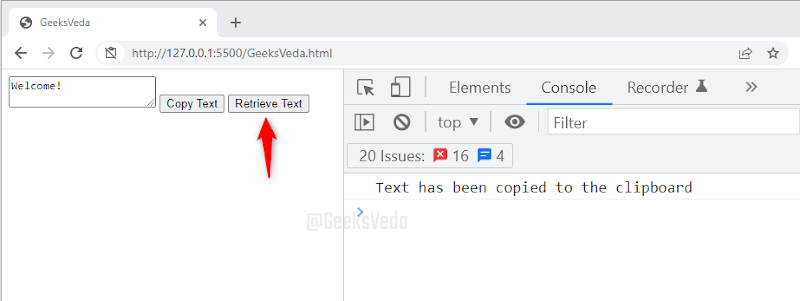
For fetching the copied text from the clipboard, click on the “Retrieve Text” button.
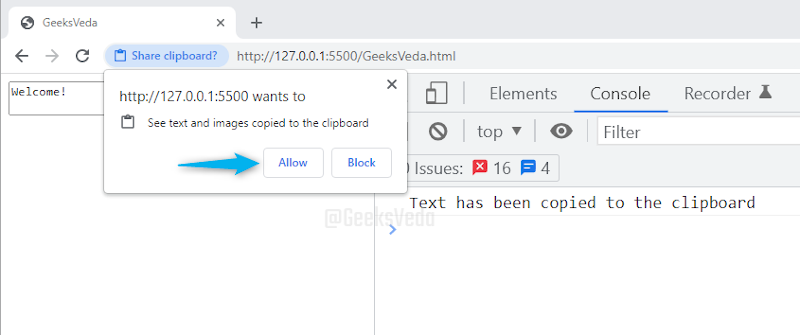
Hit the “Allow” button for granting the required permission for seeing text and images from the clipboard.
As you can see, the text copied from the clipboard has been displayed with the initial text message.
Copy Rich Text to the Clipboard in JavaScript
You can use JavaScript for copying rich text to the clipboard. For this, have a look at the enlisted steps:
- Create HTML Structure: Firstly, create a container that contains the rich text content that is required to copy to the clipboard. For instance, in the below-provided code, we will add a “<div>” element with a “
richTextToCopy” id that will store the rich text content. After that, a heading with a “<h1>” tag, a paragraph “<p>”, and an unordered list “<ul>” ordered list will be added. - Add Copy Functionality: Then, add a button having an id like “
copyRichTextButton” for triggering the copy action. Inside its relevant event listener, hide the rich text with the help of the “style.display” property. After doing so, retrieve the innerHTML of the “richTextToCopy” element. Next, utilize the “navigator.clipboard.writeText()” method for copying the rich text to the clipboard. You can also show a success message for this scenario. - Implement the Paste Functionality: Likewise, add another button with an id “
pasteRichTextButton” for triggering the paste action. Inside its event listener, call the “navigator.clipboard.readText()” method of the Clipboard API for reading the rich text from the clipboard. When the copied rich text will be retrieved successfully, the pasted rich text will be displayed as the “innerHTML” of the output div.
As discussed in the previous steps, this program demonstrated the approach for copying and pasting rich text. Here, the “DOMContentLoaded” event is utilized for making sure that the JavaScrip code runs after the HTML content has been fully loaded.
The discussed HTML elements and the relative event listeners are added and the Clipboard API methods are used for performing the copy-and-paste operations.
<!DOCTYPE html>
<html>
<head>
  <title>GeeksVeda</title>
</head>
<body>
  <button id="copyRichTextButton">Copy Rich Text</button>
  <button id="pasteRichTextButton">Paste Rich Text</button>
  <div id="richTextOutput" style="display: none;"></div>

  <!-- Adding a rich text element to be copied -->
  <div id="richTextToCopy" style="display: none;">
    <h1>Welcome to GeeksVeda</h1>
    <p>This is an example of rich text content to be copied.</p>
    <ul>
      <li>Item 1</li>
      <li>Item 2</li>
      <li>Item 3</li>
    </ul>
  </div>

  <script>
    document.addEventListener("DOMContentLoaded", function() {
      const copyRichTextButton = document.getElementById('copyRichTextButton');
      const pasteRichTextButton = document.getElementById('pasteRichTextButton');
      const richTextOutputDiv = document.getElementById('richTextOutput');
      const richTextToCopy = document.getElementById('richTextToCopy');

      copyRichTextButton.addEventListener('click', () => {
        richTextToCopy.style.display = 'none'; // Hide the rich text before copying
        const richText = richTextToCopy.innerHTML;
        navigator.clipboard.writeText(richText)
          {
            console.log('Rich text has been copied to the clipboard!');
          }
      });
      pasteRichTextButton.addEventListener('click', () => {
        navigator.clipboard.readText()
          .then(text => {
            richTextOutputDiv.innerHTML = text;
            richTextOutputDiv.style.display = 'block'; // Show the pasted rich text
            console.log("Success! Rich text has been pasted!");
          })
          .catch(error => {
            console.error('Error reading rich text from clipboard:', error);
          });
      });
    });
  </script>
</body>
</html>
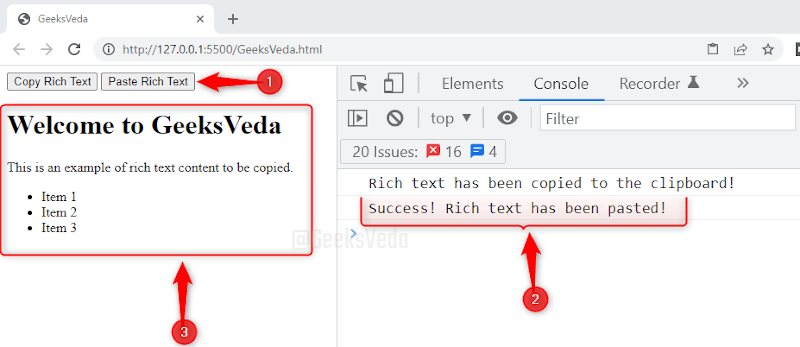
After running the project, click on the “Copy Rich Text” button. Resultantly, a message will be shown on the console, and the copied rich text will be displayed on the web page.
Copy an Image to the Clipboard in JavaScript
For the purpose of copying an image from the image to the clipboard using JavaScript, follow these steps.
- Create HTML Structure: Firstly, add an “<img>” element having an id like “
imagetoCopy” that refers to the image that needs to be copied. Next, add two buttons. One with the “copyImageButton” id for triggering the copy action and add the second one with the “pasteImageButton” id for enabling the paste action. Next, create a container “<div>” with “imageOutput” id. In this container, the pasted image will be shown. - Add Copy Functionality: As the next step, attach a click event listener to the “
copyImageButton“. Within its body, specify the message which you want to display when the image will be copied successfully. - Implement Paste Functionality: Then, attach a click event listener to the “
pasteImageButton“. Within its body, invoke the “navigator.clipboard.read()” method for retrieving the data from the clipboard. The added condition will check if the fetched data comprises image items by iterating through the “dataTransfer.items” array.Resultantly, an “<img>” element will be created dynamically if an item is an image of “image/png” or “img/jpeg” type. Its source is specified as the image URL obtained from the items which is then appended to the “imageOutputDiv” container.Lastly, the success message will be shown on the console and the image will be pasted by setting the “imageToCopy.style.display” property value to “block“.
Here, the given code demonstrates the method for copying and pasting images with the help of the Clipboard API and the “navigator.clipboard” object. The previously discussed element, their event listener, and the ClipboardJS library are utilized for enabling the copy and paste operations.
<!DOCTYPE html>
<html>
<head>
  <title>GeeksVeda</title>
  <script src="https://cdnjs.cloudflare.com/ajax/libs/clipboard.js/2.0.8/clipboard.min.js"></script>
  <style>
    #imageToCopy {
      display: none;
    }
  </style>
</head>
<body>
  <button id="copyImageButton" data-clipboard-target="#imageToCopy">Copy Image</button>
  <button id="pasteImageButton">Paste Image</button>
  <div id="imageOutput"></div>

  <script>
    const pasteImageButton = document.getElementById('pasteImageButton');
    const imageOutputDiv = document.getElementById('imageOutput');

    new ClipboardJS('#copyImageButton');
    copyImageButton.addEventListener('click', () => {
      console.log('Image has been copied to the clipboard!');
    });

    pasteImageButton.addEventListener('click', () => {
      navigator.clipboard.read()
        .then(dataTransfer => {
          if (dataTransfer.items) {
            for (let i = 0; i < dataTransfer.items.length; i++) {
              const item = dataTransfer.items[i];
              if (item.type === 'image/png' || item.type === 'image/jpeg') {
                const blob = item.getAsFile();
                const imageURL = URL.createObjectURL(blob);
                const imageElement = document.createElement('img');
                imageElement.src = imageURL;
                imageOutputDiv.appendChild(imageElement);
              }
            }
          }
          console.log("Success! Image has been pasted!");
          imageToCopy.style.display = 'block';
        })
        .catch(error => {
          console.error('Error reading image from clipboard:', error);
        });
    });
  </script>

  <!-- Adding an image source to be copied -->
  <img id="imageToCopy" src="images\testimage.jpg" alt="Image to Copy">
</body>
</html>
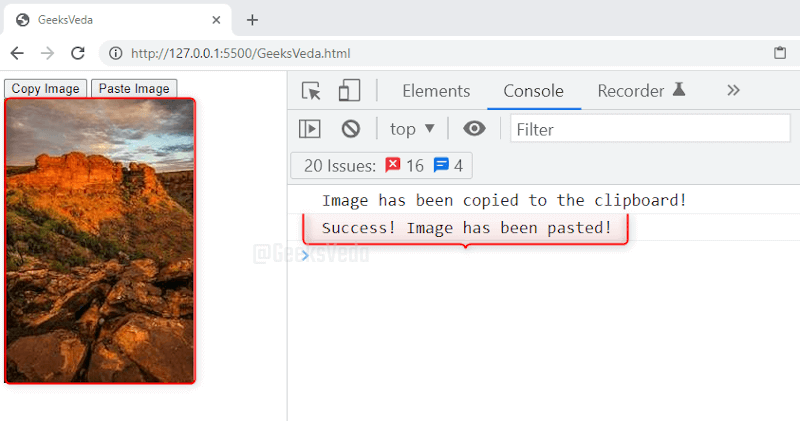
So, firstly, click on the “Copy Image” button for copying the image to the clipboard. Then, hit the “Paste Image” button for displaying the copied image in the added HTML container as follows.
Best Practices for Clipboard Integration in JavaScript
Have a look at the enlisted best practices for clipboard integration in JavaScript.
- Check out the browser support.
- Request necessary permissions.
- Provide user feedback.
- Handle errors gracefully.
- Validate clipboard data.
- Clear clipboard data when necessary.
- Secure sensitive information.
- Test across browsers and platforms.
That’s all from today’s blog related to copying to the clipboard in JavaScript.
Conclusion
Copy to clipboard functionality in JavaScript permits users to easily and conveniently save content for later use. By utilizing the Clipboard API or the other alternative approaches, developers can offer a seamless copying experience.
However, it is essential to handle user permissions, and error scenarios, and provide clear feedback to make sure a positive user experience.
Want to explore and learn more related to JavaScript, do check out our dedicated JavaScript Tutorial Series!