Welcome to our today’s guide on email address validation in JavaScript. Validating email addresses is essential for maintaining data integrity and offering a seamless user experience. In this guide, we will discuss different methods, including Regular Expression (Regex) and Built-in Email Validation, for validating email addresses in JavaScript.
Understanding these approaches will empower you to implement email validation techniques and enhance the quality of data which is collected through your web applications.
In the first section, we will discuss what a valid email address is, its components, and the relevant rules and constraints.
What is Email Validation in JavaScript
A valid email address refers to a string that is based on a specific format and is identified by email systems as a legitimate destination for electronic messages. It typically comprises two main components: the local part and the domain.
Components of an Email Address
Here, we have enlisted the components of an email address.
- Local Part – The local part is added before the “
@” symbol. It recognizes the recipient’s mailbox with the given domain. More specifically, it comprises alphanumeric characters and some particular specifical characters like underscores “_“, dots “.“, and hyphens “-“. - @ symbol – This symbol acts as a delimiter between the domain and the local part.
- Domain – This part signifies the destination service or server for the email. It comprises two more domain labels which have to be separated by dots. Additionally, each label contains hyphens and alphanumeric characters.
Rules and Constraints for Email Components
Check out the enlisted constraints and rules for each component of the email address.
The Local Part: It must start and end with an alphanumeric character. It can include underscores, dots, and hyphens, but they should not be consecutive. It can also contain quoted strings with special characters. However, the quoted strings should not be added at the start or end of the local part.
The @ Symbol: It must be placed as it serves as a delimiter between the local part and the domain.
The Domain: Each label comprises hyphens and alphanumeric characters. It must contain two or more domains separated by dots. The last label should be at least two characters long. Additionally, it cannot contain only numeric characters
Methods to Validate an Email Address in JavaScript
Noe lets Look into the different methods to validate an email address in Javascript.
1. Using a Regular Expression
Regex or regular expressions are robust patterns that are utilized for manipulating and matching the text in JavaScript. They offer a concise way of validating email addresses by specifying a pattern that matches the desired format.
How Email Validation Regex Pattern is Defined
Here is the breakdown of the email validation pattern that can be used for email validation.
- First of all, define the regex by using the “
\” delimiters. - Start the pattern with the “
^” symbol to represent the regular expression starts. - Define the local part of the email address by utilizing this pattern “
[a-zA-Z0-9._%+-]+” where:- The “
[a-zA-Z0-9]” matches any digit or letter. - The
._%+-permits the special characters in the local part. - The “
+” verifies that there should be at least one character in the local part.
- The “
- Then, add the “
@” symbol for matching the @ literal character. - Place the domain part with the help of the pattern “
a-zA-Z0-9.-]+\.[a-zA-Z]{2,}” where:- The “
[a-zA-Z0-9.-]+” matches with any combination of digits, dots, letters, or hyphens for the domain name. - The “
\.” matched the literal dot character. - The “
[a-zA-Z]{2,}” is added to match the top-level domain like org, com, having at least two characters.
- The “
- Lastly, add the “
$” symbol for ending the regex.
Validate Static Email Address Using Regex Method
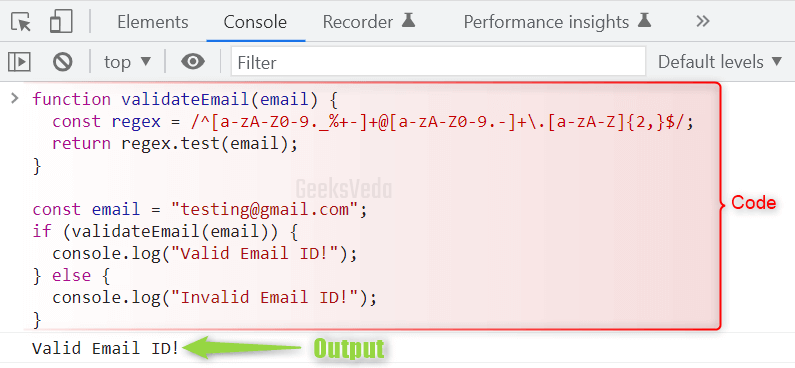
In this example, we have defined a function named “validateEmail()” which accepts an email address as input and validates it by utilizing the regular expression discussed in the previous section.
This regex pattern verifies if the specified email address matches the expected format. Like, it must have dots, alphanumeric characters, hyphens, and underscores.
Then, it should have an “@” symbol followed by the domain name which will contain the alphanumeric characters and dots. Note that the domain must end with at least two letters of the top-level domain.
After that, we assigned a static email address “testing@gmail.com” to the “email” variable. Next, an “if” condition is added which invokes the “ValidateEmail()” function and passes the email as an argument.
function validateEmail(email) {
  const regex = /^[a-zA-Z0-9._%+-]+@[a-zA-Z0-9.-]+\.[a-zA-Z]{2,}$/;
  return regex.test(email);
}

const email = "testing@gmail.com";
if (validateEmail(email)) {
  console.log("Valid Email ID!");
} else {
  console.log("Invalid Email ID!");
}
If the passed email address is a value, the added message will be printed on the console.
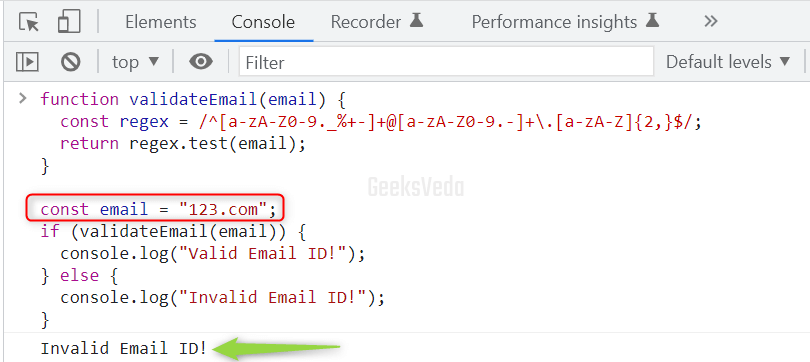
Specifying the invalid email address will display the following message.
Validate User-Defined Email Address Using Regex Method
This example will show you the procedure of validating email in a web form. To do so, we have created a form with an email input field, a submit button, and paragraph elements for displaying the message.
<!DOCTYPE html>
<html>
<head>
  <title>GeeksVeda</title>
</head>
<body>
  <form id="emailForm">
    <input type="email" id="emailInput" required>
    <button type="submit">Submit</button>
    <p id="msg"></p>
  </form>
</body>
</html>
The JavaScript code utilizes the “validateEmail()” function which follows the same pattern which we have added in the previous example. This regex will help to validate the email entered or defined by the user.
More specifically, when the form is submitted, the JavaScript code restricts the default form submission behavior. It fetched the entered email address and trimmed the starting or ending whitespace using the “trim()” method.
Then, the updated email address is passed to the “validateEmail()” function. Lastly, the added if condition tests the validity of the email and displays the resultant message accordingly.
  function validateEmail(email) {
    const regex = /^[a-zA-Z0-9._%+-]+@[a-zA-Z0-9.-]+\.[a-zA-Z]{2,}$/;
    return regex.test(email);
  }

  const form = document.getElementById('emailForm');
  const emailInput = document.getElementById('emailInput');
  const msg = document.getElementById('msg');

  form.addEventListener('submit', function(event) {
    event.preventDefault();
    const email = emailInput.value.trim();

    if (validateEmail(email)) {
      // Valid email address
      msg.textContent = '';
      alert("Valid Email ID!");
    } else {
      // Invalid email address
      msg.innerText = 'Please enter a valid email address.';
    }
  });
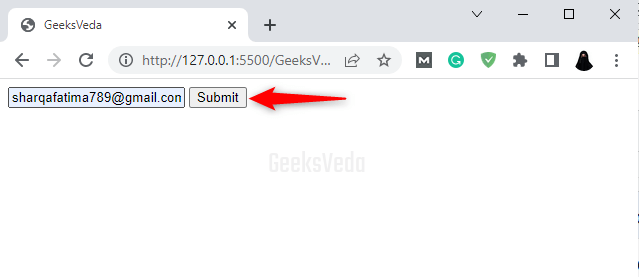
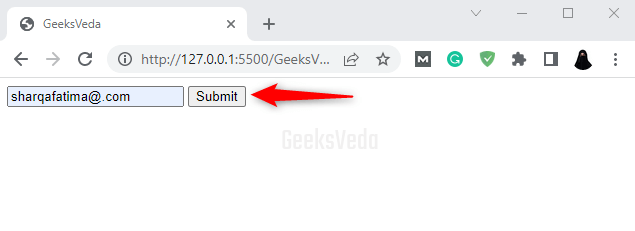
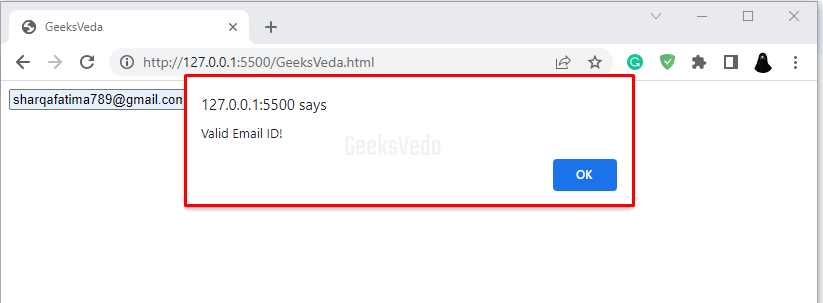
Now, we will enter a valid email address and click on the “Submit” button.
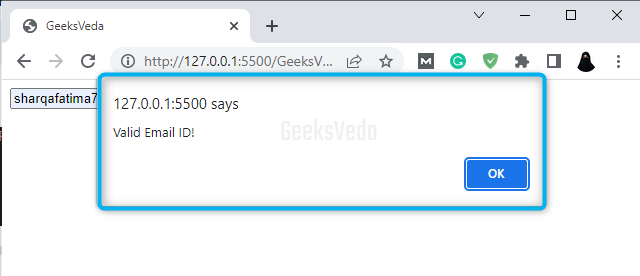
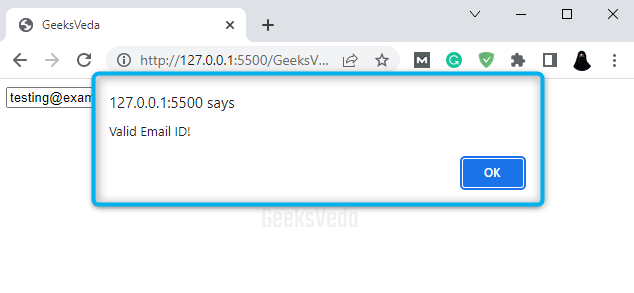
As a result, a “Valid Email ID!” message has been displayed via an alert box.
We will now check the validity of an email address.
Resultantly, you will receive the visual feedback according to the entered email.

2. HTML5 Email Validation Method
The built-in HTML5 “email” input type is specifically designed for accepting email addresses. It offers a basic level of validation. Moreover, it also makes sure that the entered value follows the email address format.
To use the browser validation in JavaScript, you can access the HTML5 email input and interact with its relevant validation properties and methods, such as the “validity” property or the “checkValidity()” method.
For instance, in the provided JS code, we have invoked the “checkValidity()” method for triggering the validation.
  const form = document.getElementById('emailForm');
  const emailInput = document.getElementById('emailInput');
  const msg = document.getElementById('msg');

  form.addEventListener('submit', function(event) {
    event.preventDefault();
    if (emailInput.checkValidity()) {
      // Valid email address
      msg.textContent = '';
      alert("Valid Email ID!")
    } else {
      // Invalid email address
      msg.textContent = emailInput.validationMessage;
    }
  });
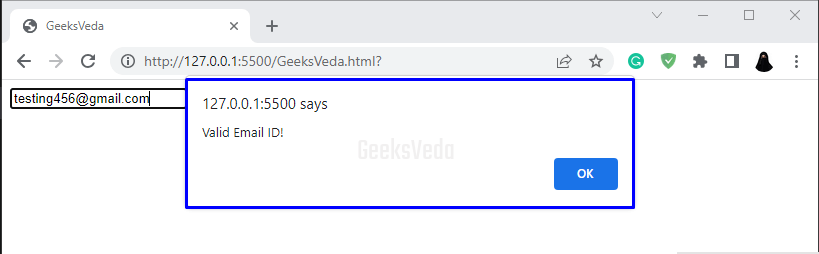
For the demonstration, we enter a valid email address and click on the Submit Button. It can be observed that the alert box indicates that the entered email address was valid.
3. Using Third-party Libraries
You can also use several third-party libraries such as “email-validator“, “validator.js“, and “jQuery Validation Plugin” for email validation.
Let’s check each of them individually!
Using “email-validator” Library
The “Email-validator” is a well-known library that offers different types of email validation functionalities. For example, it provides several approaches for validating email addresses, domain validation, syntax validation, and verifying again disposable email services.
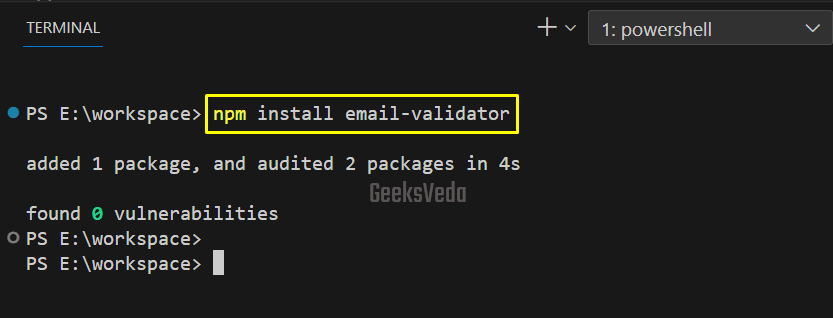
For the installation of “email-validator“, run the following command in your terminal.
npm install email-validator
Resultantly, this package will be downloaded and installed from the npm registry and will be added as a dependency in your project.
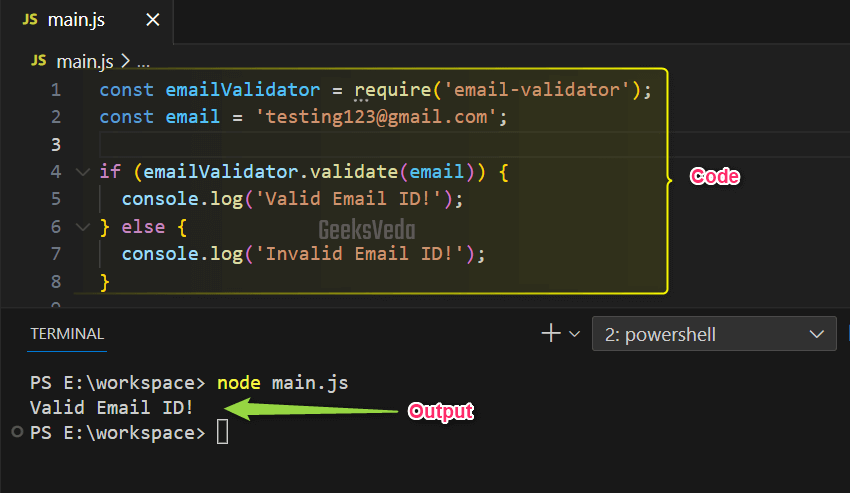
Now, the example code imports the “email-validator” library and utilizes its “validate()” function for checking if the email is valid or not and displays the added message according to the evaluation.
const emailValidator = require('email-validator');
const email = 'testing123@gmail.com';

if (emailValidator.validate(email)) {
  console.log('Valid Email ID!');
} else {
  console.log('Invalid Email ID!');
}
Using “validator.js” Library
The “validator.js” is another popular JavaScript library that provides multiple validation functions, specifically related to email validation. This library offers an intuitive and simple API for validating different URLs, data types, email addresses, and more.
To use this library, include it in your HTML file using the “<script>” tag. Then, attach an event listener on the submit event of the form, which will ultimately verify it the entered email is valid or not. For this purpose, the “isEmail()” function of the validator.js is invoked.
<script src="https://cdn.jsdelivr.net/npm/validator/validator.min.js"></script>
const form = document.getElementById('emailForm');
const emailInput = document.getElementById('emailInput');
const msg = document.getElementById('msg');
form.addEventListener('submit', function(event) {
event.preventDefault();
const email = emailInput.value.trim();
if (validator.isEmail(email)) {
// Valid email address
msg.textContent = '';
alert("Valid Email ID!");
} else {
// Invalid email address
msg.innerText = 'Please enter a valid email address.';
}
});
Using “jQuery Validation Plugin”
This plugin simplifies the tasks related to form validation. It comprises built-in validation methods including email validation. Moreover, it offers an easy way for handling validation with customizable error messages and styling.
Now, load the jQuery and the jQuery Validation plugin into your HTML file. Then, specify the validation rules for the input field with the “validate()” method. It defines that the field is required and it must contain a valid email address.
If the form is valid, the “submitHandler” function will display the “Valid Email ID!” message and submit the form.
<script src="https://code.jquery.com/jquery-3.6.0.min.js"></script>
<script src="https://cdn.jsdelivr.net/npm/jquery-validation/dist/jquery.validate.min.js"></script>
  $(document).ready(function() {
    $('#emailForm').validate({
      rules: {
        emailInput: {
          required: true,
          email: true
        }
      },
      messages: {
        emailInput: {
          required: "Please enter an email address.",
          email: "Please enter a valid email address."
        }
      },
      submitHandler: function(form) {
        // Valid form submission
        alert("Valid Email ID!");
        form.submit();
      }
    });
  });
Regular Expression Vs Built-in Email Validation in JavaScript
| Regular Expression Validation | Built-in Email Validation | |
| Definition | Custom validation by utilizing regular expression patterns. | Validation is offered by the browser or HTML5. |
| Learning Curve | Needs familiarity with regex and its syntax. | Easy to implement without having regex-related knowledge. |
| Flexibility | Highly flexible and customizable based on the requirements. | Limited customization options. |
| Browser Compatibility | Consistent behavior across different browsers. | Varies depending on the browser implementation. |
| Complexity | May involve complex regex patterns for particular requirements. | Simple and straightforward implementation. |
| Edge Cases Handling | Can handle specific edge cases with custom rules. | Standardize email scenario handling. |
| Validation Precision | Can define precise validation rules. | May have limitations in handling all scenarios. |
| Advanced Validation Features | Permits implementation of advanced validation rules. | Limited support for advanced validation requirements. |
That’s all from today’s informative guide related to validating an email address in JavaScript.
Conclusion
Validating email addresses is essential for ensuring user experience and data accuracy. More specifically, JavaScript offers multiple approaches for email validation, including Regular Expression (Regex) and Built-in Email HTML5 Validation.
While Regex provides flexibility and customization, Built-in Email Validation offers simplicity and seamless integration. So, choose the method as per your project requirements.
Want to explore and learn more related to JavaScript, do check out our dedicated JavaScript Tutorial Series!