In this series of Go Lang, we will cover all the basics and everything you need to start working and making projects with Go Lang. Instead of learning Go with isolated examples, we will go step by step and apply what we learn in a real-world scenario.
In the previous lessons, we learned how to set up our development environment on different operating systems, and in this lesson, we will start exploring the syntax of Go and how we can start writing our first Go program.
Create Go Development Environment
As we already mentioned, in order to start working with Go, we should have two things. First, we need to install the Go compiler on our machine to compile our Go code.
If you haven’t done so already, check this lesson on how to install Go Lang and choose the right method based on your operating system.
Secondly, we need a place to write the code or the code editor. You can follow along with any editor you want. However, we already mentioned in this lesson the best editors for Go Lang, from which you can choose one if you haven’t already.
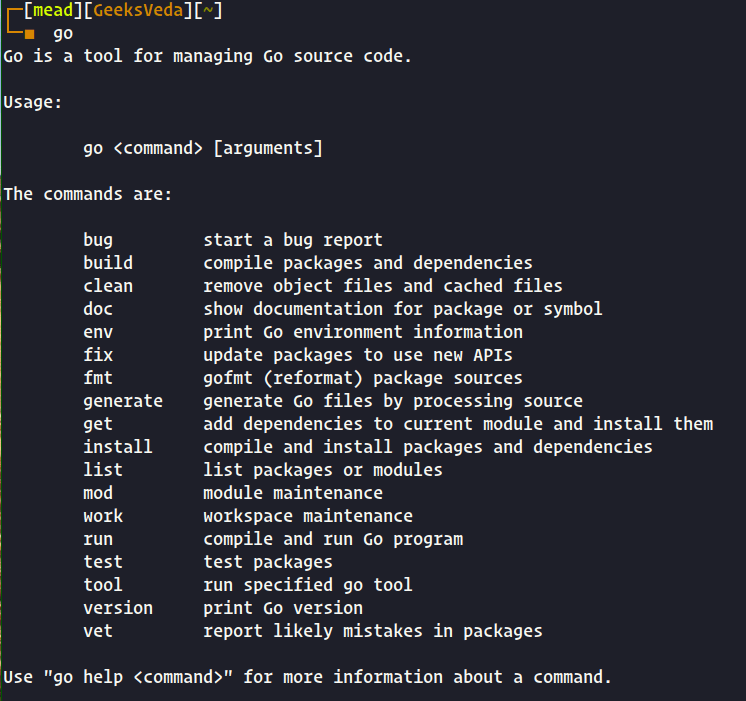
After we have all the setup, we can verify that Go is installed correctly by running the following command in your terminal or Command Prompt if you are in Windows:
# go
This will show a Go command usage and options:
Great, so we have everything prepared. Let’s start creating our first project.
Create First Go Project
In order to do that first we need to create a folder with any name you want in my case I call it go-project.
# mkdir go-project
After that, open that folder with your preferred editor.
The Structure of GO Project
In Go application development, working with CLI (Command Line Interface) tools is a common occurrence. The command line plays a significant role in the entire process of project initialization, compilation, testing, and program execution.
Let’s explore some of the go commands that we need to know:
go mod init– It is used to initialize projects in Go (using Go Modules). For the project name, you can use anything, but generally, it is the same as the directory name.go run– It is used to execute program files (files with the extension.go). How to use it by writing the command followed by the file name argument.go test– It is useful for unit test purposes. The file to be tested must end in_test.go.go build– It is used to compile and build program files. Actually, when executing a program usinggo run, a compilation process occurs as well. Compiled files will be stored in a temporary folder for immediate execution. In contrast, togo build, this command produces an executable or binary file in the currently active folder.go get– It is used to download packages in order to use in the project.
Those are some of the go commands that we’re gonna explore and use later at this point just to get an idea about each command.
Initialize Go Project
As we said in the last section, we need to initialize our project first to start working on it. So open the terminal or command prompt if you are in Windows navigate to the folder that we created earlier and enter the command:
# cd go-project/
# go mod init first-project
The command go mod init will initialize the go project with go modules and the first-project is the name of the project.
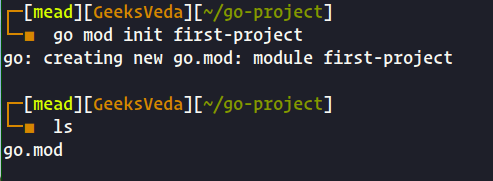
The result is will be a file with the name go.mod with the following code:
module first-project
go 1.20
It basically describes the project containing the name and the go version used.
The next step is to create the main file of our project so that inside the project folder create a new file with the name main.go and we can add this code that allows us to print hello world on the screen.
Print("Hello world")
Let’s run this and see the result. So in order to run our application we need to use the command go run followed by the name of the file.
go run main.go
And the result should be something like this with the message:
main.go:1:1: expected 'package', found Print
So in Go, everything is organized into packages and we gonna use Go packages through our application.
To fix that we just need to add the keyword package in the first line of our main file followed by the name main which is the standard name of the main package remember this all our code must belong to a package.
package main
Print("Hello world")
The second error is that we need to declare the entry point of our application (go need to know where to start the execution).
./main.go:2:1: syntax error: non-declaration statement outside function body
To fix this we just need to add a main function and the name as always must be main and we put whatever we need to execute inside that main function.
package main
func main (){
Print("Hello world")
}
Now that our application belongs to a package and we have defined the entry point, we’re still going to get an error if we try executing this code. The problem that we have here is that we don’t know where this print is coming from.
./main.go:3:1: undefined: Print
Print is coming from a Go package that is built in a package called fmt, or format, and we have explicitly imported any packages from which we are using the functions.
So we’re going to import the fmt package and to use the print function or any function with that package, we should say fmt.print and the final result will be like this:
package main
import "fmt"
func main (){
fmt.Print("Hello world")
}
And now we can execute our program without any problems.

Congratulations, we just created a Go project that prints “hello world” on the screen.
Conclusion
In this lesson, we have learned how to prepare our development environment for Go Lang and explored the necessary commands for creating and running a Go project.
We also get an idea about the structure of a Go project and how packages are used in Go and in the last section, we created our first Go program that prints “Hello World” on the screen.
This is just the beginning, and there is so much more to learn and discover about GoLang which we gonna cover in the upcoming lessons