print() function is an essential component in Python programming that can be utilized for displaying the output and facilitating debugging. With its versatility and simplicity, it is a fundamental tool for both experienced and beginner developers alike.
So, in today’s guide, we have explored the features, techniques, and best practices associated with the Python print() function. Resultantly, you will be able to maximize its effectiveness in your Python projects.
What is Python print() Function
Python print() function is utilized for showing output or some text on the console. It accepts one or more arguments and prints them to the standard output (on the console, by default). This function is primarily used for displaying information, debugging, and generating program output.
Follow the provided syntax for using the print() function in Python.
print(*objects, sep=' ', end='\n', file=sys.stdout, flush=False)
According to the given syntax.
- “
objects” parameter represents the variables or values that need to be printed. It can be a single or more argument that must be separated by commas. - “
sep” parameter refers to the separator between the objects, which is set to a space character by default. - “
end” parameter indicates the single or multiple characters that need to be appended at the end of the output. By default, it is set to the newline character “\n“. - “
file” parameter represents the output file. This parameter is set to console or standard output by default. - “
flush” parameter decides whether the output is flushed immediately or not. By default, its value has been set to “False“.
Format Output with the Python print() Function
Formatting output is essential for presenting the information in a structured manner. It also enables you to define custom separators, substitute variables, and add dynamic content in cases such as displaying user prompts, generating reports, or formatting log messages.
Print Using Variables and Literals
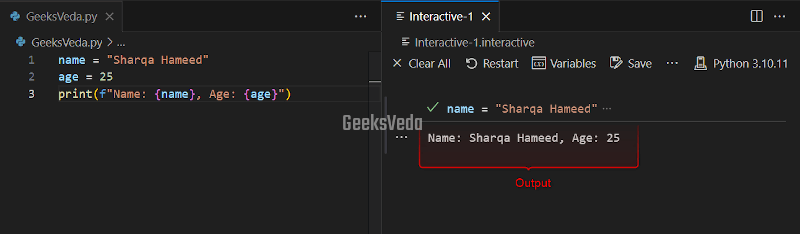
For instance, here the “f-strings” formatting approach is utilized in the print() function for printing the values of the “name” and “age” variables.
Within the string, these variables have been enclosed in the “{}” curly brackets and their respective values are inserted using the mentioned variables.
name = "Sharqa Hameed"
age = 25
print(f"Name: {name}, Age: {age}")
Print with Separators Parameter
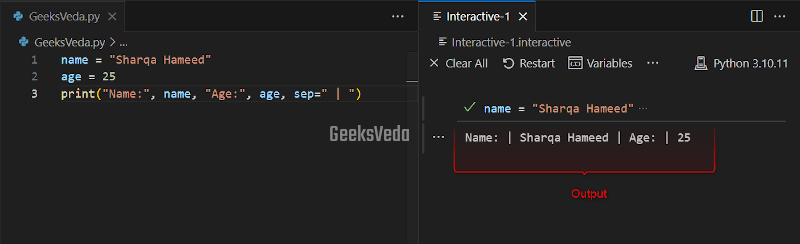
In this case, the print() function is invoked for displaying the values of the “name” and “age” variables with custom separator as “ | “. This indicates that the values of these variables will be separated with these strings by adding the specified character.
name = "Sharqa Hameed"
age = 25
print("Name:", name, "Age:", age, sep=" | ")
Print Using the Format Method
Here, the format() method is invoked in the print() function for formatting the output string. The placeholders “{0}” and “{1}” will be replaced with the values of the “name” and “age” strings.
name = "Sharqa Hameed"
age = 25
print("Name: {0}, Age: {1}".format(name, age))

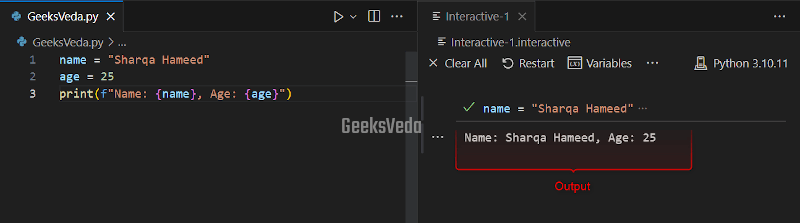
Print Using “f-strings” Method
In the given program, the “f-strings” are utilized for embedding variables “name” and “age” directly within the string. To do so, these variables are enclosed within the curly braces “{}” and their values will be inserted into the resultant string which resultantly shows the concise and dynamic output.
name = "Sharqa Hameed"
age = 25
print(f"Name: {name}, Age: {age}")
Handle Line Endings with the Python print() Function
Handling line endings with the Python print() function is crucial for maintaining consistent output across several file formats and platforms. It prevents unexpected line breaks, ensures proper formatting, and improves the displayed text’s readability. This ultimately makes it easier to interpret and work with the output.
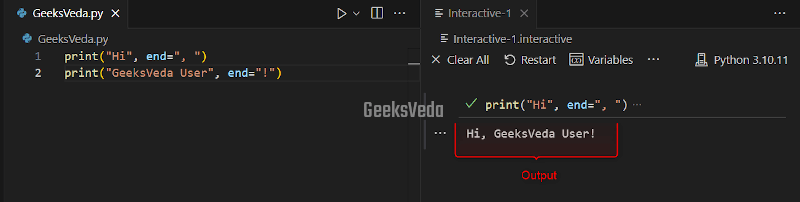
Print Using “end” Parameter
In the following example, we have invoked the “print()” function two times with separate strings. Note that the “end” parameter is set to “ , ” so that a comma and a space are added after the first string.
In the second statement, adding “!” as the end parameter value will add an exclamation mark at the end of the second string.
print("Hi", end=", ")
print("GeeksVeda User", end="!")
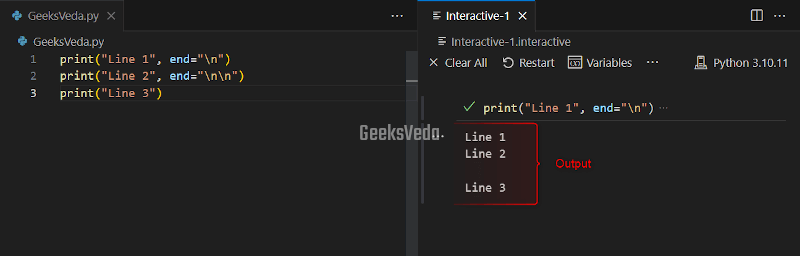
Controlling the Line Break with “end” Parameter
Here, in the first print() function, the “end” parameter is set to “\n” which indicates a newline character. Whereas, in the second statement, we have added two newline characters as “\n\n” for adding two consecutive line breaks.
print("Line 1", end="\n")
print("Line 2", end="\n\n")
print("Line 3")
As a result, the third statement uses the default “end” parameter value, adding a single line break after “Line 3“.
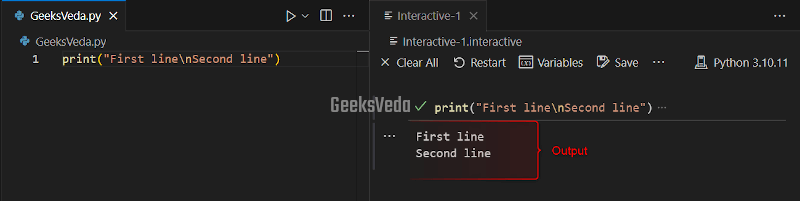
Customise Line Breaks with Escape Characters
In this scenario, the print() function is called for printing two lines. The newline character that is placed between both lines will resultantly display each part on a separate line.
print("First line\nSecond line")
Redirect Output Using Python print() Function?
Redirecting output becomes often necessary for storing or capturing program outputs in logs, files, or other destinations. It facilitates logging, debugging, and data analysis, enabling convenient retrieval and analysis of program-generated information.
Redirect print() Output to a File
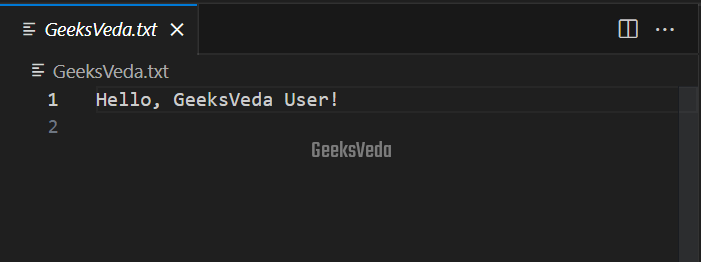
For instance, the print() function is utilized here for redirecting the output to the “GeeksVeda.txt” file. To do so, we have specified the “file” parameter and passed the “f” file object.
As a result, the print() function will write the defined string to the file.
with open("GeeksVeda.txt", "w") as f:
    print("Hello, GeeksVeda User!", file=f)
It can be observed that the line “Hello, GeeksVeda User!” has been successfully added to the file.
Redirect Output Using “sys” Module
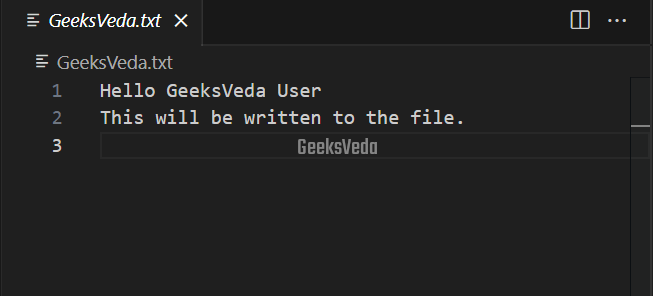
Now, we will use the “sys” module for redirecting the output of the print() function. For the corresponding purpose, a custom class “OutputRedirector” is created to handle the redirection. The print() function will write out the text to the “GeeksVeda.txt” file. Moreover, the stdout is restored to its original state using the “sys.__stdout.__“.
import sys

# Create a custom file-like object
class OutputRedirector:
    def __init__(self, filename):
        self.file = open(filename, "w")

    def write(self, text):
        self.file.write(text)

    def flush(self):
        self.file.flush()

# Redirect print() output to a file
redirector = OutputRedirector("GeeksVeda.txt")
sys.stdout = redirector

print("Hello GeeksVeda User")
print("This will be written to the file.")

sys.stdout = sys.__stdout__  # Restore the original stdout
redirector.file.close()
How to Print to Standard Error with Python print() Function
Printing to the standard error is useful when trying to log error messages and debug information separately from regular output. This assists in differentiating and prioritizing the error-related information, which enables you to efficiently diagnose the problem or perform troubleshooting.
Difference Between Standard Output and the Standard Error
Check out the given table to know about the key differences between standard output and standard error.
| Standard Output (stdout) | Standard Error (stderr) |
| The default destination for regular program output. | Dedicated channel for warnings, error messages, and diagnostic information. |
| Utilized for displaying the prompts, normal program results, and other information. | Separate handling of error-related output for troubleshooting and debugging. |
| Can be piped or redirected to other files or programs. | Not affected by piping or redirection of stdout. |
Using print() Function for Logging Error Messages and Debugging
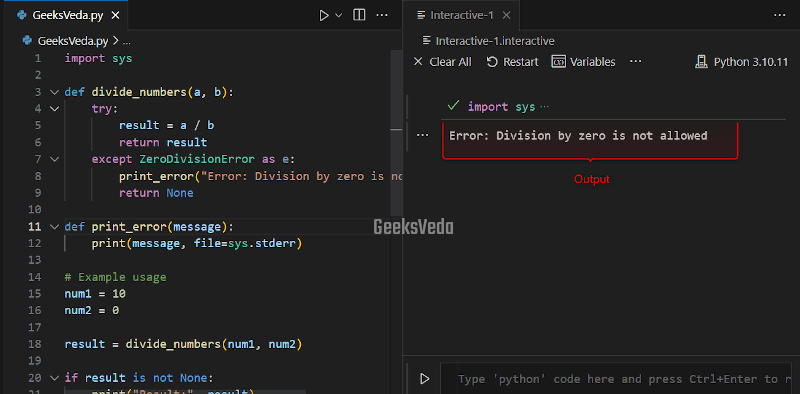
Here, the print() function is invoked for printing the error messages to the stderr or standard error by mentioning “file=sys.stderr” as the parameter.
Note that, in the “divide_numbers()” function, when the “ZeroDivisionError” occurs, the print_error() function will be called to print the error message.
The remaining part of the code demonstrated the error handling and showed the result or the respective error message respectively.
import sys

def divide_numbers(a, b):
    try:
        result = a / b
        return result
    except ZeroDivisionError as e:
        print_error("Error: Division by zero is not allowed")
        return None

def print_error(message):
    print(message, file=sys.stderr)

# Example usage
num1 = 10
num2 = 0

result = divide_numbers(num1, num2)

if result is not None:
    print("Result:", result)
else:
    print("An error occurred. Please check your input.")
Advanced Techniques and Tips for Using print() Function
Advanced techniques and tips for utilizing the print() function includes printing multiple lines with triple-quoted strings, controlling behavior with the flush parameter, and displaying or printing progress bars.
These techniques improve code readability, facilitate progress tracking, and offer flexibility in output customization.
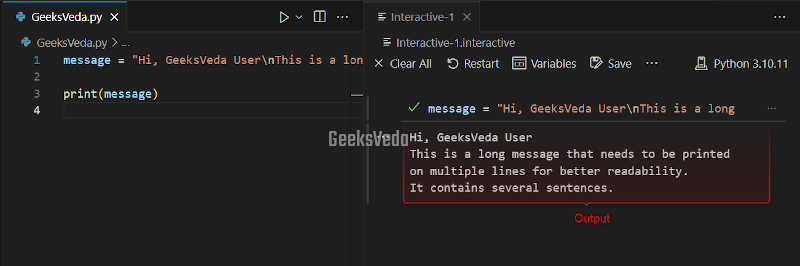
Print Multiple Lines with Triple-quoted Strings
Here, firstly, the triple-quoted strings are added for defining a multi-line message. Then, by enclosing the text or message within the triple quotes, we have preserved the newlines, which permits the print() function to display the message with the line breaks intact.
message = "Hi, GeeksVeda User\nThis is a long message that needs to be printed\non multiple lines for better readability.\nIt contains several sentences."

print(message)
Using flush Parameter in print() Function
Now, by specifying “flush=True“, the output of the print() function will be flushed immediately. This makes sure that the added message is going to display without any delay.
import time

print("Processing...", end="", flush=True)
time.sleep(2)
print("Done.")
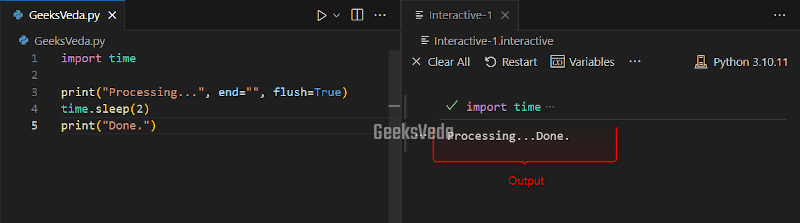
This technique can be used when real-time progress updates are required.
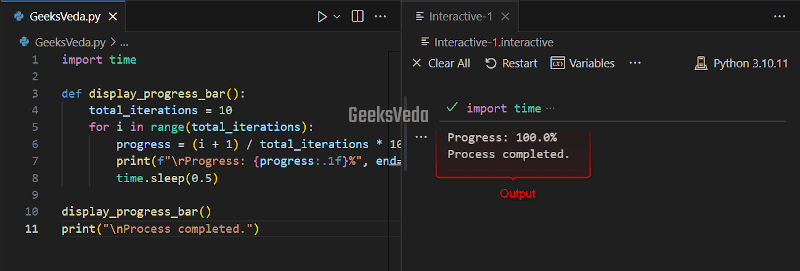
Display Progress Bar with print() Function
In the provided program, the “display_progress_bar():” function calculates the progress percentage and updates it dynamically with the help of the “\r” character as a progress bar. This moves the cursor back to the start of the line.
Within each iteration, the loop updates the progress message and the “time.sleep()” method then stimulates the processing time.
Lastly, the given message has been displayed indicating that the process has been completed.
import time

def display_progress_bar():
    total_iterations = 10
    for i in range(total_iterations):
        progress = (i + 1) / total_iterations * 100
        print(f"\rProgress: {progress:.1f}%", end="")
        time.sleep(0.5)

display_progress_bar()
print("\nProcess completed.")
Handle Unicode and Non-ASCII Characters with print() Function
Handling Unicode and non-ASCII characters with the print() function involves encoding, decoding, and proper error handling.
It allows accurate representation and printing of text in multiple languages and character sets.
This resultantly promotes multilingual support and internationalization in Python programs.
Encode and Decode Unicode Characters
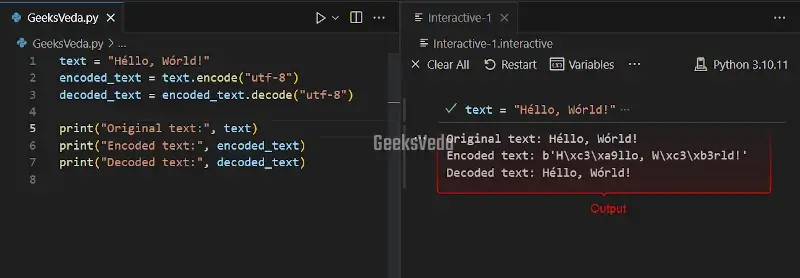
Now, we will demonstrate the method of encoding and decoding the Unicode characters with the help of the print() function. To do so, we have defined a “text” variable having a string with non-ASCII characters.
The “encode()” method is then used for converting the text to a byte sequence using the UTF-8 encoding.
Likewise, the “decode()” will convert the encoded byte sequence back to the string. Lastly, the print() statements will display the original, encoded, and decoded text on the terminal.
text = "Héllo, Wórld!"
encoded_text = text.encode("utf-8")
decoded_text = encoded_text.decode("utf-8")

print("Original text:", text)
print("Encoded text:", encoded_text)
print("Decoded text:", decoded_text)
Handle Unicode Errors with “errors” Parameter
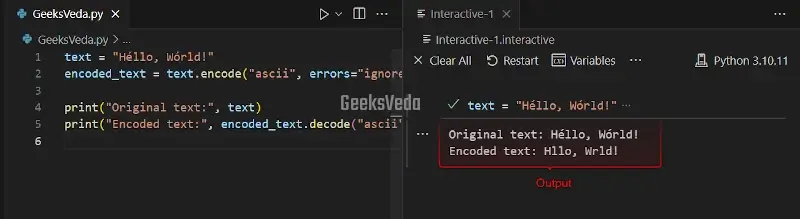
In this example, we have a text variable comprising the non-ASCII characters. Then, we specified the “errors” parameter to “ignore” for ignoring the error and showing the encoded text without any update.
On the other hand, the decoded text is displayed using the “replace” error handler, which replaces any invalid characters with a question mark.
text = "Héllo, Wórld!"
encoded_text = text.encode("ascii", errors="ignore")

print("Original text:", text)
print("Encoded text:", encoded_text.decode("ascii", errors="replace"))
Print non-ASCII Characters with print() Function
In this scenario, we are directly displaying the string “text” that contains the non-ASCII characters.
text = "Héllo, Wórld!"
print(text)
Add Colors with ANSI Escape Sequences in print() Function
To enhance the visual representation of the output text, the ANSI escape sequences can be used in the print() function. These sequences permit the colorized output to visually distinguish the element and improve the overall user experience.
Using Escape Sequences for Colorized Output
As stated earlier, you can utilize the ANSI escape sequences in the print() function for applying colors to the text output. This approach enables you to apply color formatting to a specific portion of the text and create interactive and visually appealing displays.
Change Text Color in Terminal
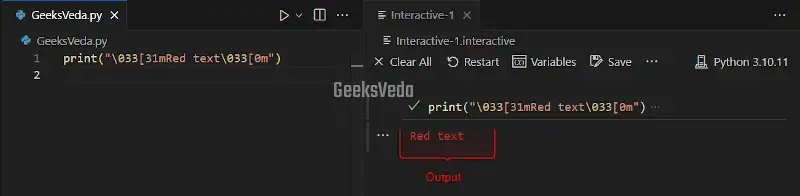
For instance, we have defined “\033[31m” for starting the red color, and “\033[0m” is added to reset the color to default after displaying the red-colored text on the console.
print("\033[31mRed text\033[0m")
Apply Background Colors
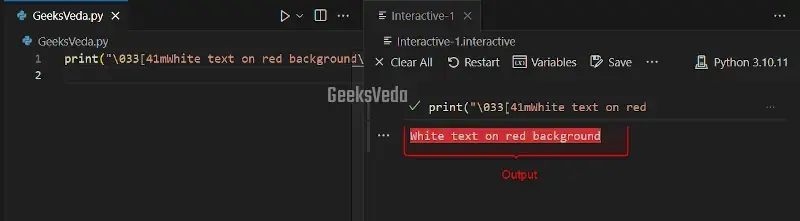
Now, let’s apply the background color to the text. Note that the escape sequence “\033[41m” sets the background color to red and “\033[0m” resets the color to the default.
As a result, white text will be displayed with a red background.
Best Practices of Using Python print() Function
Have a look at the stated best practices for using the print() function.
- Utilize descriptive and clear messages.
- Format output for readability.
- Consider using logging for advanced debugging.
- Minimize the excessive use of the print() function.
- Use ANSI escape sequences for colorizing output.
- Handle line endings consistently.
- Handle Unicode and non-ASCII characters properly.
Conclusion
Python print() function is a robust tool for showing or displaying output in programs. Therefore, its features like handling line endings, output formatting, redirecting output, and Unicode support improve its functionality and code readability.
Moreover, follow the best practices for also considering the performance of your projects.
Want to explore and learn more related to Python, do check out our dedicated Python Tutorial Series!