Progress bars are considered essential elements in software development as they provide feedback regarding the progress of operations and tasks. Therefore, in this post, we have explored several techniques for creating progress bars in Python.
From traditional text-based approaches to using third-party libraries, and implementing the custom approaches, we will cover multiple methods.
By following the best practices and incorporating advanced features, you can design interactive and informative progress bars that can improve the user experience as well.
How to Make a Progress Bar in Python
Traditional approaches for creating a progress bar in Python comprise basic techniques like using string manipulation, print statements, or using time delays and loops.
These approaches can easily visually represent the operation or task progress which ultimately provides feedback to the user regarding the completion status.
Using Python Text-Based Progress Bar
A Text-based progress bar is based on a simple approach that involves the usage of the print() function and string manipulation for showing the progress visually. It prints a series “#” along with the percentage completion.
This type of progress bar is often utilized in scripts or command-line applications where a Graphical User Interface (GUI) is not needed. Moreover, you can easily implement this progress bar as it offers a basic indication of progress.
Here, in the provided code, a “for loop” is added that calculates the percentage of the progress and displays a series of “#” characters for representing the progress visually.
This progress percentage can be calculated by dividing the current step by the total steps and multiplying it by 100.
total = 10
for i in range(1, total+1):
    progress = i / total * 100
    print(f"Progress: [{progress}%] {'#' * i}", end="\r")
#” characters, where the “\r” parameter is added over the previous line, ultimately creating a dynamic effect.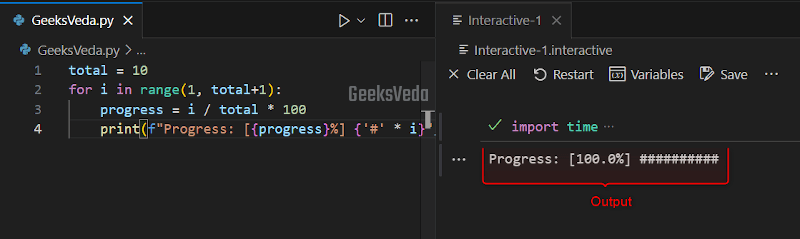
Using Python Time Delays and Loops Progress Bar
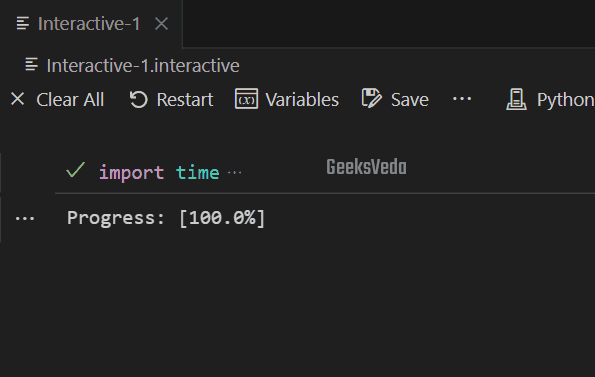
You can also incorporate time delays and loops in a Python progress bar. For applying this approach, the “time” module can be used for adding delays between each loop iteration.
Resultantly, the progress bar will show the printed progress percentage on each iteration. This gives an impression of a progressing bar.
import time

total = 10
for i in range(1, total+1):
    progress = i / total * 100
    print(f"Progress: [{progress:.1f}%]", end="\r")
    time.sleep(0.5)
In the given program, we have implemented a simple progress bar with the help of time delays and loops. The program starts by specifying the total number of steps as “10“. Then, the “for” loop is defined which iterates from 1 to 10.
More specifically, within each iteration, the progress percentage has been calculated and the progress bar has been shown by printing the progress bar with the decimal precision followed by the “%” symbol.
Additionally, the “time.sleep(0.5)” will add a 0.5 seconds delay between each iteration which will display a visible progression effect.
Create Progress Bar in Python Using Third-party Libraries
This section will demonstrate the procedure for creating a progress bar by using third-party libraries, such as “tqdm” and “PySimpleGUI“.
Using “tqdm” Library
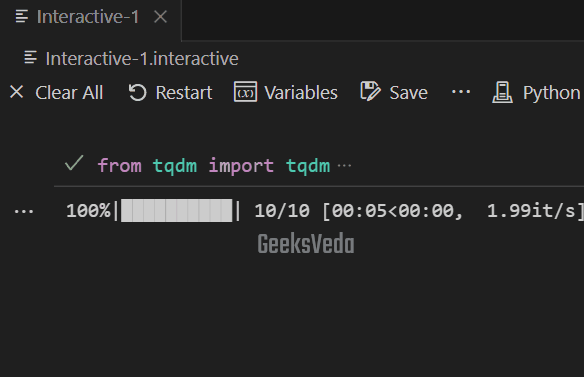
“tqdm” is a popular Python library that can be utilized for creating progress bars in Python. It offers an intuitive and simple way of visualizing the loop progress or task.
To use this library, you have to install it first with the following command. After that, you can import it into your program.
pip install tqdm
For instance, after installing the “tqdm” library, we imported it and the “time” module in our Python script for creating an interactive progress bar. The total number of iterations has been set to “10“.
More specifically, the function “tqdm(range())” is wrapped in the “for” loop for creating the progress bar.
The “time.sleep()” method adds up a “0.5” second delay between each iteration, permitting the time for the progress bar to update.
from tqdm import tqdm
import time

total = 10
for i in tqdm(range(1, total+1)):
    time.sleep(0.5)
Here, the “tqdm” library is in charge of displaying and updating the progress bar dynamically.
Using “PySimpleGUI” Library
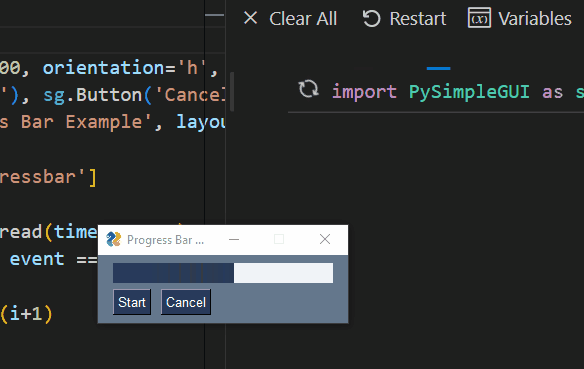
“PySimpleGUI” is another essential Python library that can assist you in creating GUI interfaces. It comprises components for creating progress bars having a GUI interface.
In order to use this library, install it first with this command.
pip install PySimpleGUI
After doing so, we will import the “PySimpleGUI” as “sg” for defining the GUI window layout. This layout will include a progress bar with the mentioned size and key. Then comes the “sg.Window()” function that is invoked for creating the window with the defined layout.
You can access the progress bar component with the “progressbar” key. Then, the “for” loop iterates from 0 to 99 and updates the progress bar value on each iteration.
After that, the read() function waits for user input or an event that makes the GUI responsive.
import PySimpleGUI as sg

layout = [[sg.ProgressBar(100, orientation='h', size=(20, 20), key='progressbar')],
          [sg.Button('Start'), sg.Button('Cancel')]]
window = sg.Window('Progress Bar Example', layout)

progress_bar = window['progressbar']
for i in range(100):
    event, values = window.read(timeout=100)
    if event == 'Cancel' or event == sg.WINDOW_CLOSED:
        break
    progress_bar.update_bar(i+1)
window.close()
The added “for” loop continues to run until the “Cancel” event is triggered and the window is closed.
Create a Progress Bar in Python Using ASCII and Tkinter
Now, let’s check out some approaches for creating a progress bar such as an ASCII art progress bar and a GUI progress bar using “tkinter“.
Create ASCII Art Progress Bars
ASCII art can be utilized for representing the data visually. This approach is considered useful when it is required to customize the progress bar appearance or when working in a text-based environment.
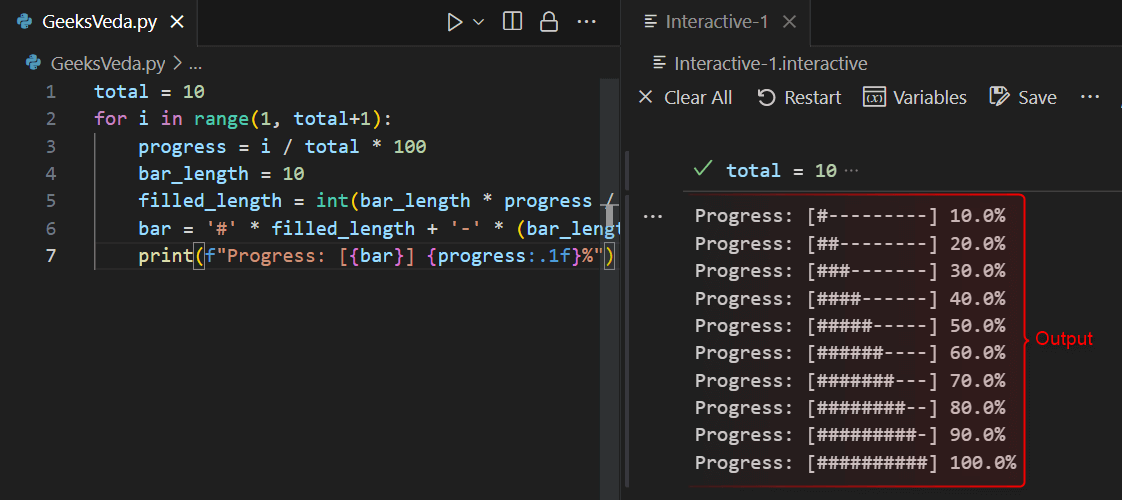
For instance, we have specified the total number of steps as “10“. After that, a “for” has been added for calculating the percentage of the progress and resultantly creating an ASCII art bar based on it.
Note that the bar length is fixed and is constructed with “#” for the filled part and “-” characters representing the remaining part.
total = 10
for i in range(1, total+1):
    progress = i / total * 100
    bar_length = 10
    filled_length = int(bar_length * progress / 100)
    bar = '#' * filled_length + '-' * (bar_length - filled_length)
    print(f"Progress: [{bar}] {progress:.1f}%")
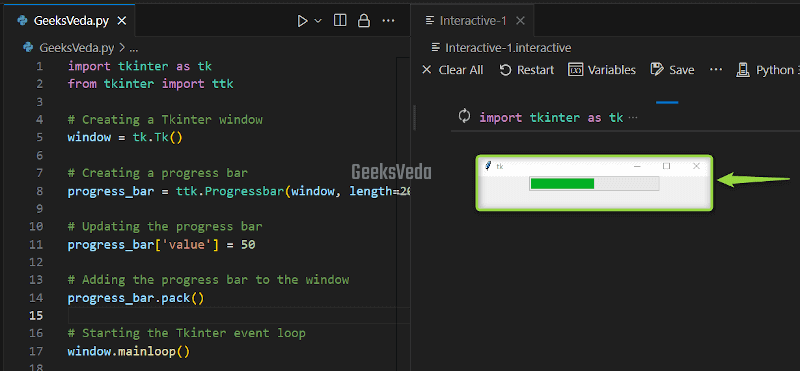
Create a GUI Progress Bar Using “tkinter”
“tkinter” is a built-in Python library that comprises a “ttk.Progressbar” class for creating a GUI progress bar. For instance, here in the below example, we have first imported the “tkinter” and “ttk” modules.
Then, a tkinter window is created and the relevant progress bar widget is to the window.
More specifically, the progress bar value has been updated for representing the progress. Lastly, the tkinter loop has started for displaying the window and handling user interactions.
import tkinter as tk
from tkinter import ttk

# Creating a Tkinter window
window = tk.Tk()

# Creating a progress bar
progress_bar = ttk.Progressbar(window, length=200)

# Updating the progress bar
progress_bar['value'] = 50

# Adding the progress bar to the window
progress_bar.pack()

# Starting the Tkinter event loop
window.mainloop()
Create a Advanced Progress Bar in Python
Python also supports advanced progress bar features such as creating multi-threading and asynchronous progress bars or a progress bar with the percentage and estimated arrival time (ETA). Let’s discuss each of these approaches in detail.
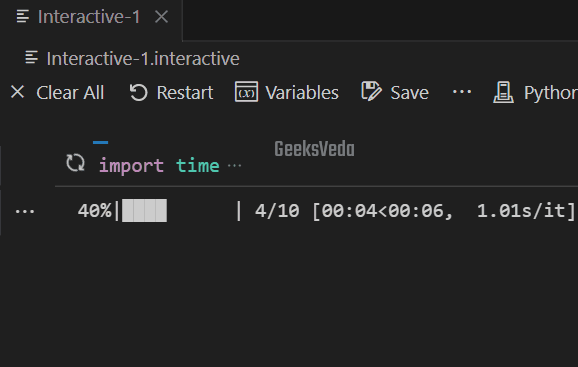
Multi-Threading and Asynchronous Progress Bar
In different use cases, long-running tasks can be asynchronous programming or multi-threading to prevent blocking of the main thread and offer a more responsive user interface.
For the corresponding purpose, the “tqdm” library can be used for creating a multi-threading and asynchronous progress bar.
In the provided program, a background task has been defined as a “long_running_task” function. Then, the “tqdm” function is invoked for wrapping the loop that indicates the task progress.
After that, a separate thread has been created to run the background task, while the main thread continued with other tasks.
import time
import threading
from tqdm import tqdm

# Defining a function for the background task
def long_running_task():
    for _ in tqdm(range(10)):
        time.sleep(1)

# Creating a thread for the task
thread = threading.Thread(target=long_running_task)

# Starting the thread
thread.start()

# Do other tasks in the main thread

# Waiting for the thread to finish
thread.join()
Observe that the background task updates in real-time as the background task progresses. Lastly, the main thread waits for the background thread to finish with the “thread.join()” method.
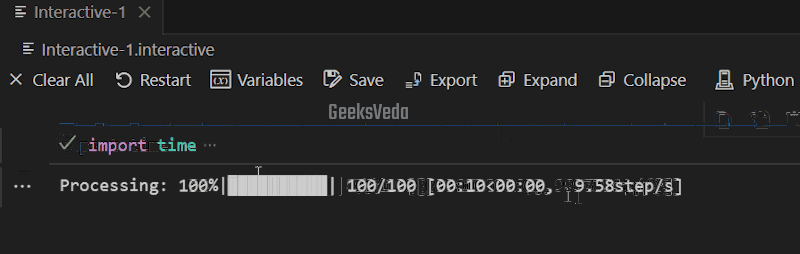
Progress Bar with Percentage and ETA
You can also create a customized progress bar that can provide extra information to the user such as showing the ETA or the percentage completion.
More specifically, the “tqdm” library supports the calculation and displays the percentage and the relevant ETA.
For instance, the provided program utilized the “tqdm” library for creating an interactive progress bar with a total of “100” steps. It shows the progress percentage and the ETA while stimulating the given task having a time delay of 0.1 seconds per step.
import time
from tqdm import tqdm

# Defining the total number of steps
total_steps = 100

# Iterating over the steps with a progress bar
for i in tqdm(range(total_steps), desc='Processing', unit='step'):
    time.sleep(0.1)
Best Practices for Creating a Progress Bar in Python
Here, we have stated some of the best practices for creating a progress bar in Python.
- Set clear objectives and relevant expectations for the progress bar.
- Utilize suitable units and formatting for the progress bar representation.
- Observe the context and adjust the update frequency accordingly.
- Offer indicators or visual feedback on progress.
- Test the progress bar functionality.
- Handle errors and exceptions.
- Optimize the efficiency and performance of the progress bar.
That’s all from today’s informative guide related to creating a progress bar in Python.
Conclusion
Progress bars in Python can improve the user experience and provide valuable feedback on task progress. By utilizing the traditional approaches, third-party libraries, and other customized options, developers can avail diverse options.
Moreover, implementing best practices and advanced features like multithreading and percentage display enhances user satisfaction and intuitiveness.
Want to explore and learn more related to Python, do check out our dedicated Python Tutorial Series!