In Python, the “time.sleep()” method plays an essential role in the management of delays during code execution.
This simple yet robust function enables you to pause the program’s flow for the defined duration. Moreover, you can also use this method for several practical applications, such as delaying execution, creating animated effects, implementing retry mechanisms, and simulating real-world processes.
So, get ready to explore the “time.sleep()” method, its syntax, usage, and further alternatives that are supported by Python!
What is time.sleep() Function in Python
The “time.sleep()” method in Python is a built-in function that permits you to introduce time delays or pauses in the execution of the code.
More specifically, this function belongs to the “time” module in the standard Python library, which offers multiple time-related functions for managing and measuring time intervals.
This function can be utilized in those scenarios where it is required to add a pause or delay between particular operations for simulating real-world processes.
How Does time.sleep() Work in Python
The time.sleep() method works by accepting a single argument, which is known as the delay duration (in seconds).
When this method is invoked, it suspends the execution of the current thread for the defined time period before enabling the program to continue the next instruction.
Here is the syntax of the “time.sleep()” method.
time.sleep(seconds)
In the given syntax, “seconds” is the argument that refers to the time duration according to which the program will be paused.
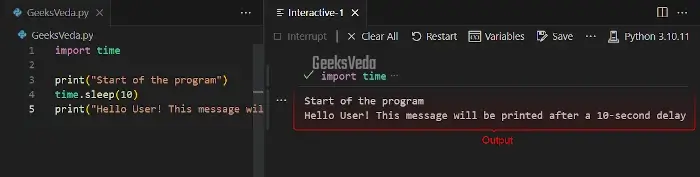
1. Clarify the Time Argument
For example, in the provided code, firstly, we have imported the “time” module. After that, a print statement will be displayed on the console that indicates that the execution of the program has been started.
Next, we call the “time.sleep()” method and pass “10” as its argument.
This resultantly pauses the program for ten seconds before moving to the next line.
How to Use time.sleep() Function in Python
You can use the “time.sleep()” method in your Python projects for managing program timing, creating animations, controlling the flow of the operations, and simulating real-world scenarios.
However, it is essential to utilize it carefully and avoid excessive delays as they can affect the performance of the program.
Have a look at some of the practical uses of the “time.sleep()” method.
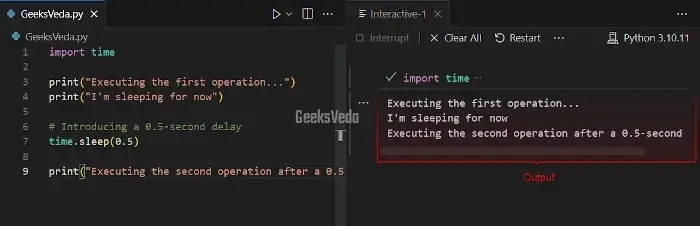
1. Use time.sleep() to Delay the Execution of a Function
One of the primary uses of the “time.sleep()” method is to add the delay between certain operations within the code. This becomes handy when it is required to control the timings of particular actions or you want to introduce pause for a better user experience.
For instance, the given program will first display the first two messages using the print() function.
Then, pause for 0.5 seconds with the “time.sleep()” method. Lastly, it shows the added message after the delay.
import time

print("Executing the first operation...")
print("I'm sleeping for now")

# Introducing a 0.5-second delay
time.sleep(0.5)

print("Executing the second operation after a 0.5-second delay...")
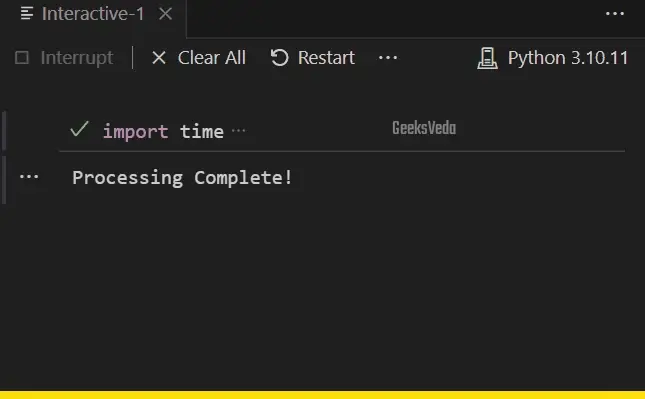
2. Use time.sleep() to Create Animation Effects
The “time.sleep()” method can also help you in creating animation effects. For example, in the provided code, we are creating a spinner animation effect that is referred to as a simple loading indicator.
This spinner will rotate through the specified set of characters “-“, “\“, “|“, and “/” for creating the illusion of motion.
Then, the “sys.stdout.write()” is called for applying the animation on the same line. Here, the “\r” acts as a carriage return that transfers the cursor back to the start of the line.
This enables the characters to overwrite each other and ultimately present the animation effect.
import time
import sys

def animate_spinner():
    spinner = ['-', '\\', '|', '/']
    for _ in range(3):
        for symbol in spinner:
            sys.stdout.write(f"\rProcessing {symbol}   ")
            sys.stdout.flush()
            time.sleep(0.2)
    sys.stdout.write("\rProcessing Complete!     \n")

animate_spinner()
It can be observed that we have successfully created a spinner animation effect using the “time.sleep()” method.
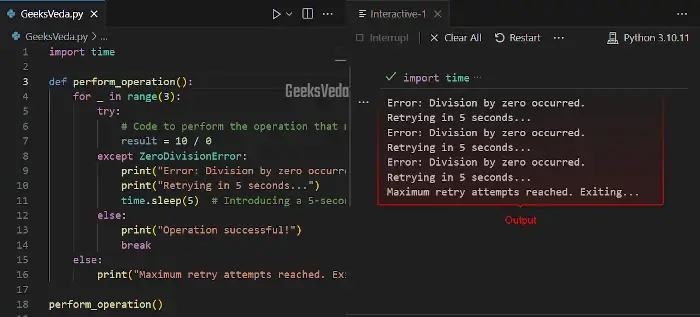
3. Use time.sleep() to Implement Retry Mechanism
You can also utilize the “time.sleep()” method for implementing the retry mechanism in your Python projects. This can be found useful when dealing with actions or operations that may trigger some temporary issues or errors.
Here, in the provided code, the “perform_operation()” will try to perform a division operation that can trigger the “ZeroDivisionError“.
So, if the mentioned error occurs, the program enters into the retry mechanism and introduces a five-second delay before the next attempt.
Note that this whole process will repeat three times before exiting if unsuccessful.
import time

def perform_operation():
    for _ in range(3):
        try:
            # Code to perform the operation that may raise an exception
            result = 10 / 0
        except ZeroDivisionError:
            print("Error: Division by zero occurred.")
            print("Retrying in 5 seconds...")
            time.sleep(5)  # Introducing a 5-second delay before the next attempt
        else:
            print("Operation successful!")
            break
    else:
        print("Maximum retry attempts reached. Exiting...")

perform_operation()
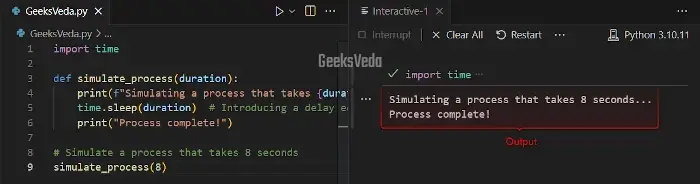
4. Use time.sleep() to Simulate Real-World Processes
In the given code, we will demonstrate the use of the “time.sleep()” method for simulating real-world processes, specifically, during the development and testing phases.
For instance, the “simulate_process()” function of the provided program shows how a simulated process can accept a specified duration with time.sleep() method.
Then, by invoking “simulate_process()” with the “8” argument, the program will take an eight-second pause for the duration of the simulation.
import time

def simulate_process(duration):
    print(f"Simulating a process that takes {duration} seconds...")
    time.sleep(duration)  # Introducing a delay equal to the specified duration
    print("Process complete!")

# Simulate a process that takes 8 seconds
simulate_process(8)
Handling Delays and Timing in Python
Handling delays and timing in Python is crucial for multiple reasons, such as:
- Controlling Execution Flow: Delays permit you to pause the execution between critical tasks, wait for external events, or synchronize multiple threads. This ultimately improves the program’s reliability and predictability.
- Resource Utilization: Introducing proper delays is essential for utilizing the resource effectively. As, fast-paced and uncontrolled execution can cause excessive CPU usage, which resultantly decreases the battery life and also overheats the devices.
How to Choose Appropriate Sleep Durations
It is important to choose the most suitable sleep duration in order to meet the specific use cases:
- Background Operations: For background operations, such as data processing, longer delays that are based on several seconds are appropriate for balancing resource consumption and performance.
- Interactive Applications: For interactive applications, you can consider shorter delays comprising a few hundred milliseconds for maintaining responsiveness and preventing the user from frustration.
Alternatives to time.sleep() function
Python also offers some alternatives for more advanced scheduling and precise timing. These approaches include the “timeit” module, the “time.monotonic()” method, and threading and asynchronous programming.
Let’s check out the mentioned alternatives one by one!
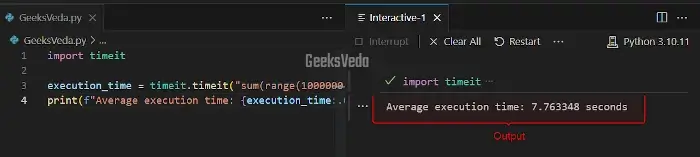
1. Python timeit Module
The Python “timeit” module offers a more accurate way of measuring the execution time of the small code snippets. Moreover, it also assists in optimizing the critical sections of the code.
In the following program, we have utilized the “timeit.timeit()” method for measuring the execution time of the code.
import timeit

execution_time = timeit.timeit("sum(range(1000000))", number=100)
print(f"Average execution time: {execution_time:.6f} seconds")
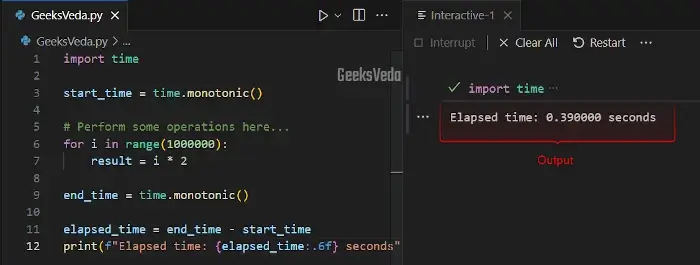
2. Python time.monotonic() Method
the “monotonic()” is a method that is supported by the “time” module for measuring the time intervals without being affected by the changes in the system time.
This makes it an ideal choice for performance benchmarks and critical timing.
Here, the “time.monotonic()” method is involved in measuring the elapsed time (the difference between the starting and ending time of the program execution).
import time

start_time = time.monotonic()

# Perform some operations here...
for i in range(1000000):
    result = i * 2

end_time = time.monotonic()

elapsed_time = end_time - start_time
print(f"Elapsed time: {elapsed_time:.6f} seconds")
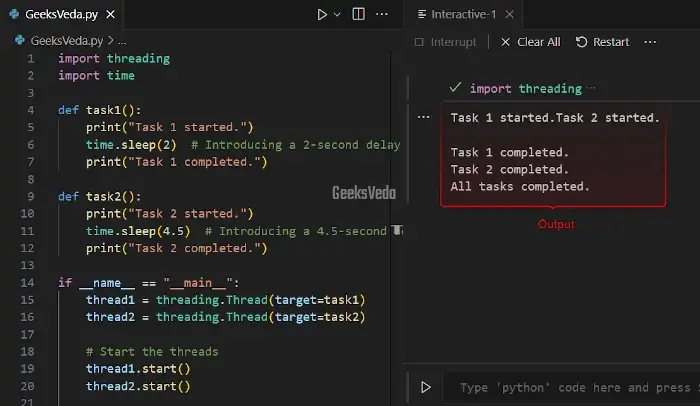
3. Python Threading
You can consider threading the advanced timing and parallel execution. For instance, we have used the “threading” module for creating two separate threads for running different tasks at the same time.
Here, each task comprises a “time.sleep()” method for introducing delays and simulating real-world scenarios that need different time duration for completion.
import threading
import time

def task1():
    print("Task 1 started.")
    time.sleep(2)  # Introducing a 2-second delay
    print("Task 1 completed.")

def task2():
    print("Task 2 started.")
    time.sleep(4.5)  # Introducing a 4.5-second delay
    print("Task 2 completed.")

if __name__ == "__main__":
    thread1 = threading.Thread(target=task1)
    thread2 = threading.Thread(target=task2)

    # Start the threads
    thread1.start()
    thread2.start()

    # Wait for both threads to finish
    thread1.join()
    thread2.join()

    print("All tasks completed.")
Comparison with Other Alternatives
Check out the below-given table for comparing the “time.sleep()” method with the other discussed approaches:
| Approach | Purpose | Precision | Parallel Execution | Supported Libraries/Modules |
| time.sleep() | Introduce a delay in program execution. | Millisecond (ms) | Single-threaded | Built-in time module |
| timeit() | Measure the execution time of code snippets. | Microsecond (μs) | Single-threaded | Built-in timeit module |
| time.monotonic() | Measure elapsed time independent of system time. | Microsecond (μs) | Single-threaded | Built-in time module |
| Threading | Concurrently executes tasks in threads. | Microsecond (μs) | Multi-threaded | threading module |
That’s all from this effective guide regarding the use of time.sleep() method.
Conclusion
Python’s “time.sleep()” method is a robust tool that can be utilized for adding time delays in the program. It permits you to pause code executions for particular durations.
This makes it valuable for performing tasks such as creating animated effects, synchronization, and error handling. However, for more advanced timing, go for the “timeit.timeit()“, “time.monotonic()” method, or threading, as per your project needs.
Want to explore and learn more related to Python, do check out our dedicated Python Tutorial Series!