Python Pandas is a popular open-source library widely utilized for performing operations related to data manipulation, analysis, and visualization.
With its powerful data structures and supported functions, Pandas offers an easy-to-use interface for performing several data-related tasks. It can handle multiple data types, including matrix, tabular, and time-series data.
In the previous articles, we discussed Python Operators, Comments, Lists, and Functions.
Now, let’s step up towards data manipulation, transformation, wrangling, and visualization with the help of Python Pandas Library!
1. Installing and Importing Python Pandas
As discussed earlier, Pandas is a popular open-source library utilized for data manipulation and analysis. It offers powerful data structures that can be used while working with structured data. To use this library, it is essential to install and import it.
For the purpose of installing and importing Pandas into the Python environment, follow the provided instructions.
1.1 How to Install Pandas Using PIP
Pandas can be easily installed with the help of the pip package manager or Anaconda.
In case you want to use pip, firstly, ensure pip is already installed or use the following command to install it on your Linux distributions.
$ sudo apt install python3-pip         [On Debian, Ubuntu, and Mint]
$ sudo yum install python3-pip         [On RHEL/CentOS/Fedora and Rocky Linux/AlmaLinux]
$ sudo emerge -a dev-lang/pip          [On Gentoo Linux]
$ sudo apk add py3-pip                 [On Alpine Linux]
$ sudo pacman -S python-pip            [On Arch Linux]
$ sudo zypper install python3-pip      [On OpenSUSE]
On MacOS, you use ensurepip module, which will install pip in a Python environment.
$ python -m ensurepip --upgrade
On Windows systems, you can install pip using ensurepip module, which can install in a Python environment as shown.
C:> py -m ensurepip --upgrade
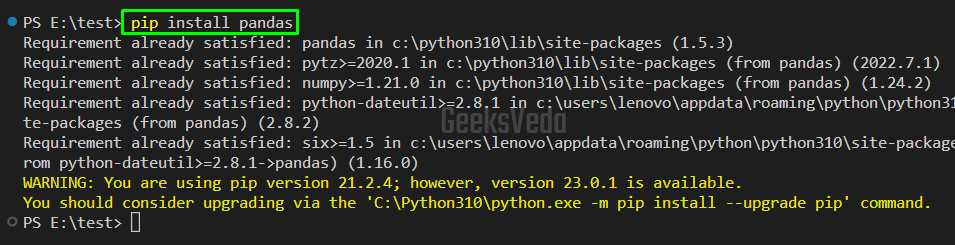
Once pip is installed on the system, you can use pip to install Pandas with the relevant dependencies that will be downloaded to your system.
$ pip install pandas
1.2 How to Install Pandas Using Anaconda
Want to utilize Anaconda for Pandas installation? Then download the Anaconda Installer and install it using our Anaconda installation guide.
Once Anaconda is installed, type the following command in the Anaconda prompt or your command line to install Pandas.
conda install pandas
1.3 How to Import Pandas in a Python File
After installing Pandas, import it into the Jupyter Notebook or Python file using the “import” statement.
For instance, we have imported Pandas with the help of the standard alias “pd“.
import pandas as pd
Resultantly, the whole Pandas library will be now available under the pd namespace.
1.4 How to Verify Pandas Installation
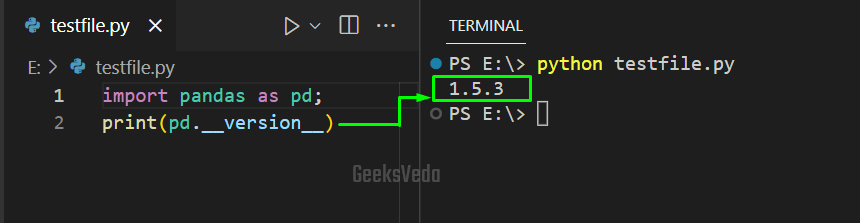
Add the following code in your Python script for the verification of the Pandas installation.
import pandas as pd;
print(pd.__version__)
It can be observed from the output that we have successfully installed Pandas version 1.5.3.
2. Data Structures in Pandas – Series, and DataFrames
Pandas library is based on the following two main data structures that are explained below.
- Series – A Pandas Series is a 1D or One-Dimensional array-like object that can hold several data types, like strings, floats, integers, and Python Objects. It has an index position that gives labels to each array element which permits easy and efficient data access.
- DataFrames – A Pandas DataFrame is a 2D or Two-Dimensional table-like data structure that comprises columns and rows. It acts similar to an SQL table or spreadsheet and can handle multiple data types including structured and unstructured data.
2.1 How to Create a Pandas Series in Python
To create a Pandas series, firstly, we imported the “pandas” library to our Python file. Then, we have defined a list named “my_list“. After that, a Pandas series object is created from this list.
More specifically, the “pd.Series()” method is invoked for converting the list into a Series object having an automatically generated index. Lastly, the “print()” function prints out the Series object on the console.
import pandas as pd

my_list = [11, 22, 33, 44, 55]
my_series = pd.Series(my_list)
print(my_series)

2.2 How to Create a Pandas DataFrame in Python
For the purpose of creating a DataFrame, the first step is to define a list of lists named data. Then, utilize the “pd.DataFrame()” method, pass the created data list as an argument and specify the column names.
As a result, a Pandas DataFrame object named df will be created that can be displayed with the print() function.
import pandas as pd

data = [['Alex', 25], ['Adam', 30], ['Max', 35]]
df = pd.DataFrame(data, columns=['Name', 'Age'])
print(df)

2.3 How to Access Rows and Columns in a Pandas DataFrame
In order to access some particular rows and columns in a Pandas DataFrame, utilize the “loc” and “iloc” methods accordingly.
- loc – This method enables you to retrieve the rows and columns with respect to their label. This label can be an integer representing the index or a string referring to the column name.
- iloc – This method permits you to access rows and columns according to their integer position, where the integer indicates the row or column index position.
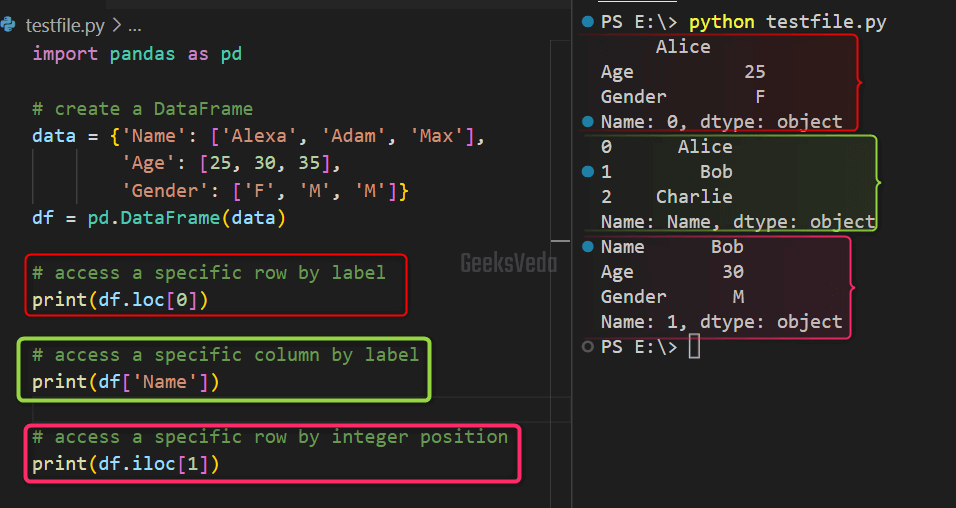
For instance, in the provided code, we have created a DataFrame that comprises three columns, “Name“, “Age“, and “Gender” and then accessed the specific rows and columns.
import pandas as pd

# create a DataFrame
data = {'Name': ['Alexa', 'Adam', 'Max'],
        'Age': [25, 30, 35],
        'Gender': ['F', 'M', 'M']}
df = pd.DataFrame(data)

# access a specific row by label
print(df.loc[0])

# access a specific column by label
print(df['Name'])

# access a specific row by integer position
print(df.iloc[1])
Here:
- “
df.loc[0]” accesses the row having a “0” label as its index and displays all of its columns. - “
df['Name']” accesses the “Name” column and prints out all its rows. - “
df.iloc[1]” accesses the row with the integer position “1” and shows all of its columns.
3. Data Manipulation and Transformation With Python Pandas
Pandas allow you to manipulate and transform Pandas data structures such as Series and DataFrames. Specifically, on the Pandas DataFrames, you can perform operations like data aggregation, sorting, and filtration.
The below-given sub-sections will explain each of the mentioned operations both theoretically and practically!
3.1 How to Perform Data Aggregation on a Pandas DataFrame in Python
Data aggregation is known as the operation to summarize the data for serving meaningful insights from it. Python Pandas allow you to perform data aggregation on a DataFrame by grouping it on the basis of the defined criteria or condition and then applying a function to each group.
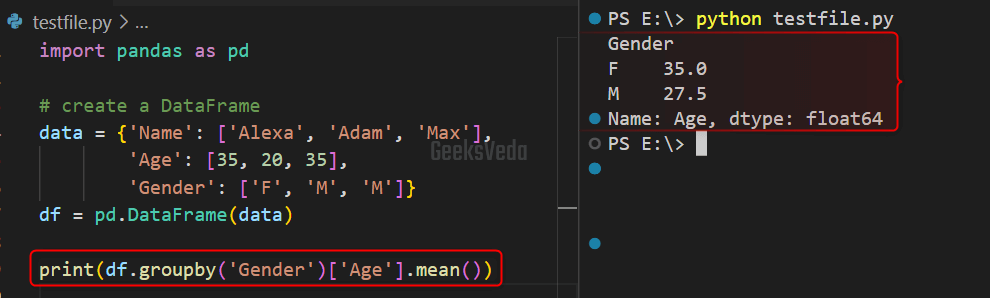
For instance, in the following example, we have created a dictionary named “data” having three keys and their respective values in the form of a list. Then, the “pd.DataFrame()” method is invoked for creating a DataFrame from the created dictionary and stored in the “df” variable.
After doing so, the DataFrame df is grouped with the “Gender” column with the help of the “groupby()” function. Then, the “mean()” function is applied to the “Age” column. Lastly, the mean of the Age column for each group will be printed.
import pandas as pd

# create a DataFrame
data = {'Name': ['Alexa', 'Adam', 'Max'],
        'Age': [35, 20, 35],
        'Gender': ['F', 'M', 'M']}
df = pd.DataFrame(data)

print(df.groupby('Gender')['Age'].mean())
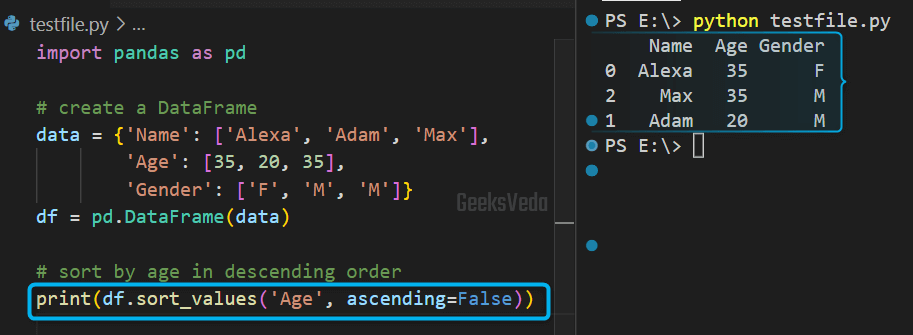
3.2 How to Sort Values of a Pandas DataFrame in Python
Using Pandas, you can also arrange the rows based on single or multiple columns in ascending or descending order. For the corresponding purpose, utilize the “sort_values()” function.
Likewise, we have created a DataFrame as we did previously. Then, we called the sort_values() function for sorting the “df” by the “Age” column in descending order.
To do so, we have passed “ascending=False” as the second argument.
import pandas as pd

# create a DataFrame
data = {'Name': ['Alexa', 'Adam', 'Max'],
        'Age': [35, 20, 35],
        'Gender': ['F', 'M', 'M']}
df = pd.DataFrame(data)

# sort by age in descending order
print(df.sort_values('Age', ascending=False))
It can be observed that the sorted DataFrame has been displayed on the terminal.
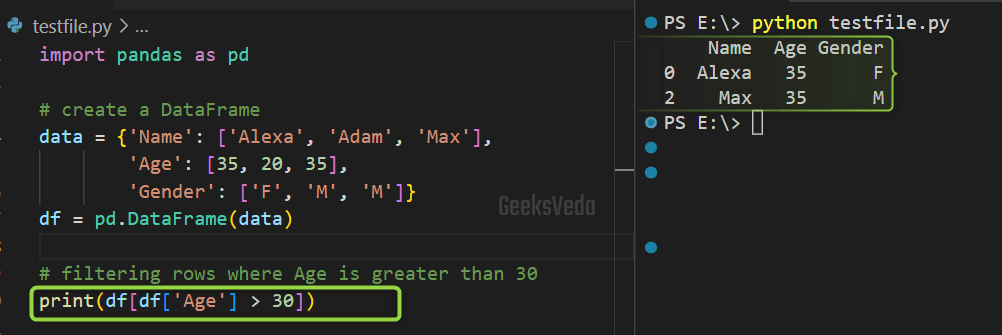
3.3 How to Filter Values of a Pandas DataFrame in Python
Want to select rows based on a particular criterion? If yes then perform the filtration on the DataFrame.
For instance, in our case, we have created a DataFrame and then filtered its rows where the Age column is greater than 30 defined as a “[df['Age'] > 30]” boolean expression.
import pandas as pd

# create a DataFrame
data = {'Name': ['Alexa', 'Adam', 'Max'],
        'Age': [35, 20, 35],
        'Gender': ['F', 'M', 'M']}
df = pd.DataFrame(data)

# filtering rows where Age is greater than 30
print(df[df['Age'] > 30])
The defined boolean series is passed to the DataFrame for selecting the rows where the defined criteria are met.
4. Data Wrangling With Python Pandas
Data Wrangling involves the operations related to cleaning, transforming, and manipulating data, resultantly, in making it suitable for analysis.
Operations such as handling missing data, reshaping and pivoting data, and removing duplicates come under this area. Python Pandas offers several functions and tools that can assist you in working with tabular data and preparing it for further transformation and analysis.
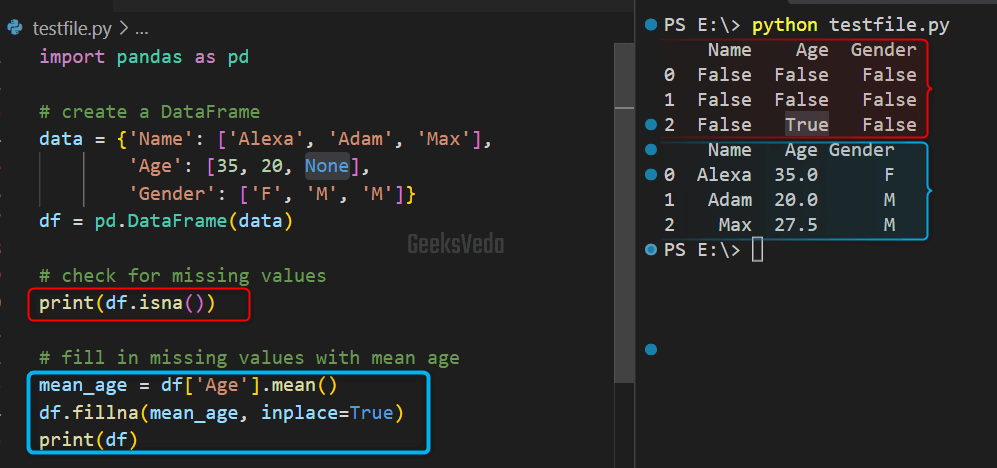
4.1 How to Handle Missing Data of a Pandas DataFrame in Python
To demonstrate to you the approach to handling the missing data, firstly, we have created a DataFrame with missing values.
Then, the “df.isna()” method is called which checks for the missing values of the “Age” column. Lastly, the missing values will be filled with the mean age with the help of the “fillna()” method.
import pandas as pd

# create a DataFrame
data = {'Name': ['Alexa', 'Adam', 'Max'],
        'Age': [35, 20, None],
        'Gender': ['F', 'M', 'M']}
df = pd.DataFrame(data)

# check for missing values
print(df.isna())

# fill in missing values with mean age
mean_age = df['Age'].mean()
df.fillna(mean_age, inplace=True)
print(df)
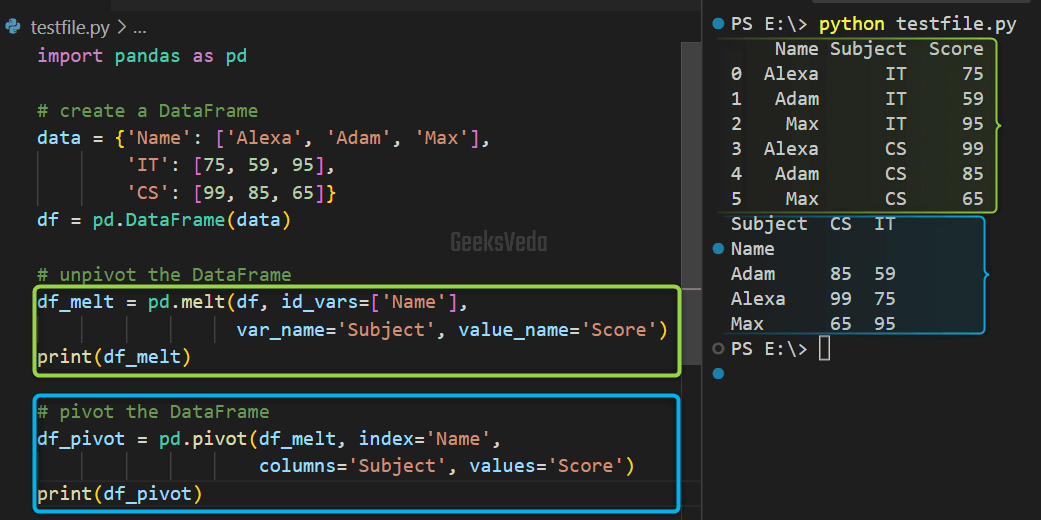
4.2 How to Reshape and Pivot Pandas DataFrame in Python
The process of transforming a DataFrame from one shape to another is known as Reshaping. Whereas, Pivoting means reorganizing the data table by rotating the dataset for converting it into a more manageable format.
Both of the mentioned procedures are used for the data rearrangement and summarization which make it easy to analyze and visualize data.
In the provided example, we have created a DataFrame of the student’s scores related to different subjects. Then, we used the “melt()” method for unpivoting the DataFrame and converting it into a long format.
Lastly, the “pivot()” method is invoked for reshaping the DataFrame back to the original format.
import pandas as pd

# create a DataFrame
data = {'Name': ['Alexa', 'Adam', 'Max'],
        'IT': [75, 59, 95],
        'CS': [99, 85, 65]}
df = pd.DataFrame(data)

# unpivot the DataFrame
df_melt = pd.melt(df, id_vars=['Name'],
                  var_name='Subject', value_name='Score')
print(df_melt)

# pivot the DataFrame
df_pivot = pd.pivot(df_melt, index='Name',
                    columns='Subject', values='Score')
print(df_pivot)
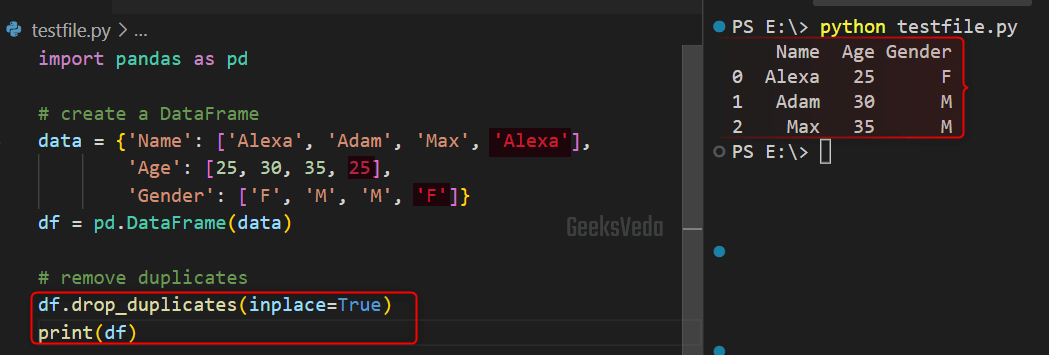
4.3 How to Remove Duplicates From a Pandas DataFrame in Python
Having duplicate rows can cause a lot of issues in data analysis. However, Pandas is always there to help you out. Let’s see how it does so!
In the provided example, we have created a DataFrame with duplicate rows. So, in order to remove them afterward, the “df.drop_duplicates()” method is called.
In this method, the “inplace=True” argument is passed for permitting modification of the original DataFrame.
import pandas as pd

# create a DataFrame
data = {'Name': ['Alexa', 'Adam', 'Max', 'Alexa'],
        'Age': [25, 30, 35, 25],
        'Gender': ['F', 'M', 'M', 'F']}
df = pd.DataFrame(data)

# remove duplicates
df.drop_duplicates(inplace=True)
print(df)
5. Data Visualization With Python Pandas
In Python, you can create different types of data representations using the Pandas library. This process is also called Data Visualization.
It is considered a crucial aspect in terms of data analysis. More specifically, data visualization assists in easily understanding and interpreting extensive or complex data sets.
Using Python Pandas, you can visualize data in various forms, including scatter plots, line plots, and bar charts. Moreover, Pandas also provides some built-in visualization tool that makes it easy to generate these plots and customize them with respect to the labels, colors, or titles, as per your requirements.
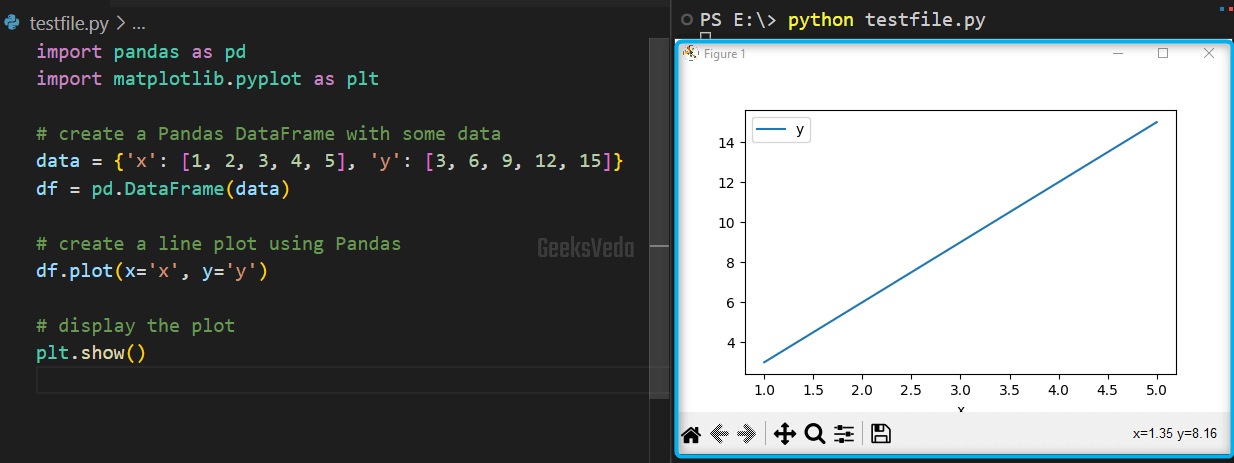
5.1 How to Create a Line Plot in Python
In Python, a Line plot is usually created for comparing the values of two variables or visualizing the trend of the variable over time.
It can be utilized in those scenarios where it is required to show how a variable is continuously changing with respect to time or any other variable.
Matplotlib” library. In case, if you don’t have it already, install it by utilizing the provided command.pip install matplotlib
To create a Line plot, firstly, import both “pandas” and “matplotlib” libraries. Then, create a Pandas DataFrame having the data that needs to be plotted.
Next, utilize the “plot()” method of the created DataFrame object “df” and specify the “x” and “y” values to be plotted. In the end, invoke the “show()” method that is offered by the Matplotlib library for displaying the plot.
import pandas as pd
import matplotlib.pyplot as plt

# create a Pandas DataFrame with some data
data = {'x': [1, 2, 3, 4, 5], 'y': [3, 6, 9, 12, 15]}
df = pd.DataFrame(data)

# create a line plot using Pandas
df.plot(x='x', y='y')

# display the plot
plt.show()
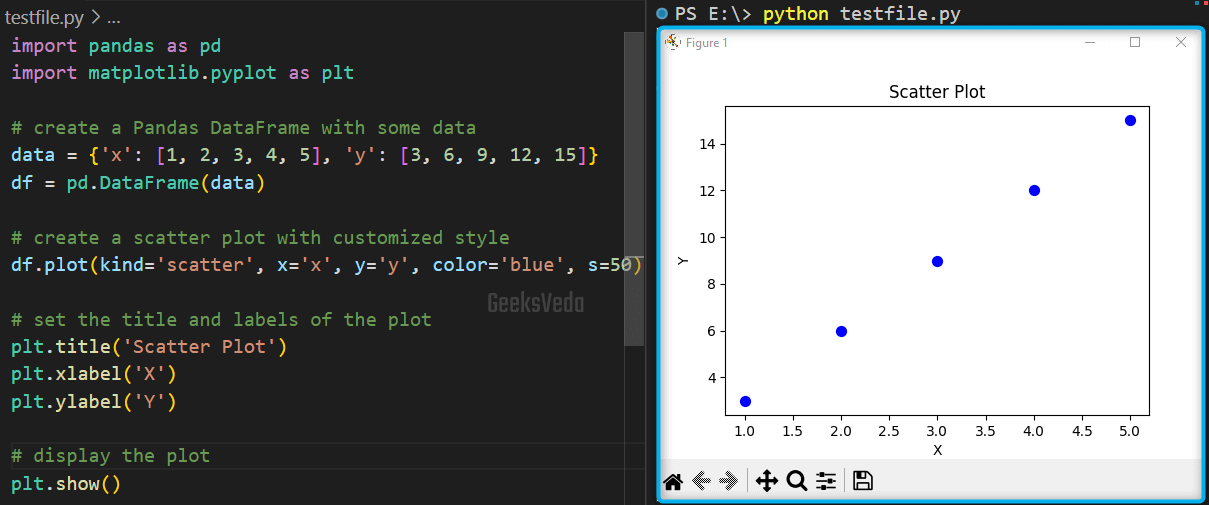
5.2 How to Plot API in Python
Plotting API in Python permits you to customize the visual appearance of the required plot, adjust various parameters or add annotations as well.
The resulting plots can be then utilized for exploring and communicating relationships and patterns in data or to support data-driven decision-making.
To plot API, likewise, we have created a DataFrame. Then, we called the “plot()” method and specified the kind of plot as “scatter“, “x“, and “y” values, color as “blue“, and the marker size is “50“.
Next, we have set the title, and labels of the plot using the respective methods. Lastly, the “show()” method is invoked for displaying the plot.
import pandas as pd
import matplotlib.pyplot as plt

# create a Pandas DataFrame with some data
data = {'x': [1, 2, 3, 4, 5], 'y': [3, 6, 9, 12, 15]}
df = pd.DataFrame(data)

# create a scatter plot with customized style
df.plot(kind='scatter', x='x', y='y', color='blue', s=50)

# set the title and labels of the plot
plt.title('Scatter Plot')
plt.xlabel('X')
plt.ylabel('Y')


# display the plot
plt.show()
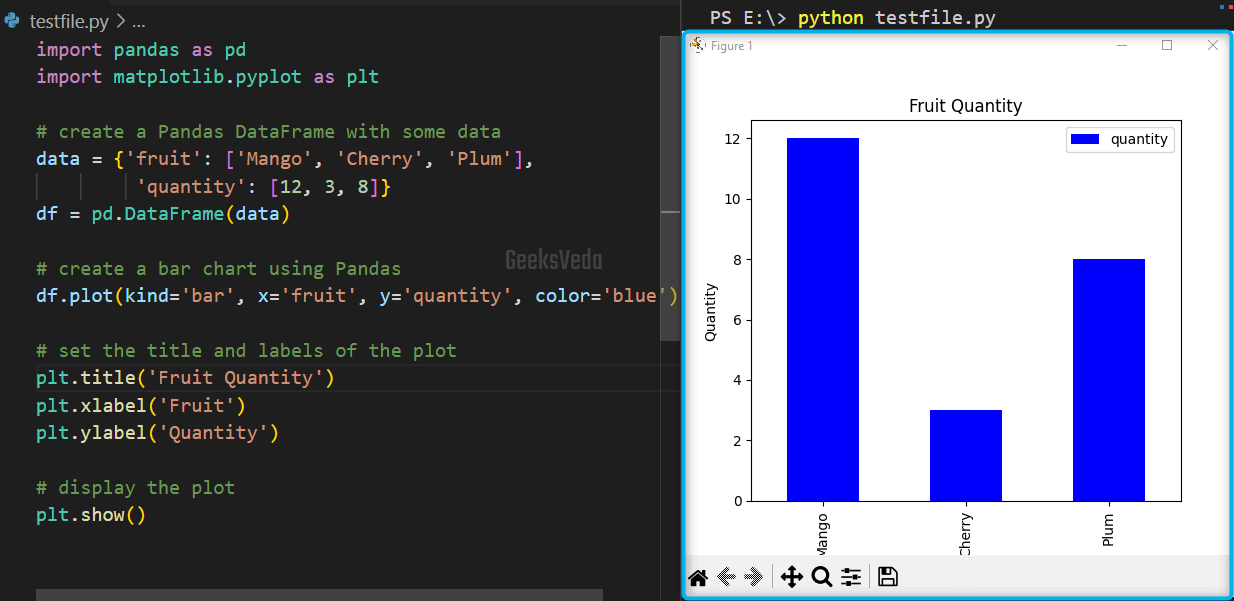
5.3 How to Plot Data Using Pandas Built-in Visualization Tools in Python
The built-in visualization tools of Pandas library offer a high degree of customization, using which you can enhance the appearance of the plot according to the requirements. This can be utilized when you need to create a visualization for publications, reports, or presentations.
Similar to the previous example, we have created a Pandas DataFrame. Then, invoked the “plot()” method while passing the “kind” of the plot as “bar“, “x“, and “y” values as “fruit” and “quantity“, and setting the “color” of the plot as “blue“.
Next, we have set the titles and labels of the plot. In the end, the customized plot has been displayed using the “show()” method.
import pandas as pd
import matplotlib.pyplot as plt

# create a Pandas DataFrame with some data
data = {'fruit': ['Mango', 'Cherry', 'Plum'],
         'quantity': [12, 3, 8]}
df = pd.DataFrame(data)

# create a bar chart using Pandas
df.plot(kind='bar', x='fruit', y='quantity', color='blue')

# set the title and labels of the plot
plt.title('Fruit Quantity')
plt.xlabel('Fruit')
plt.ylabel('Quantity')

# display the plot
plt.show()
That’s how you can use the Python Pandas library.
Conclusion
Python Pandas is an established and well-documented library that offers a wide range of features for data analysis and manipulation.
It is the perfect tool for anyone using Python to work with data. Because of its adaptability, simplicity, and efficiency, it is considered a useful tool for all levels of data scientists, including beginners and professionals.
Want to explore and learn more related to Python, do check out our dedicated Python Tutorial Series!